Virtual ][

Copyright © Gerard Putter
Overview
Introduction
About the ROM image file
Run a demo to test the installation
Where to find Apple II documentation
About the evaluation version and licensed versions
Starting and stopping the application
Saving and restoring machine snapshots
General operation
Devices
The Apple II keyboard
Working with disk images
5.25" floppy disk drive
Hard disk and 3.5" floppy disk drive
Printer
Serial I/O
Cassette recorder
80-column card for the Apple ][ and Apple ][+
80-column display on the Apple //e
AppleMouse
Real time clock
Z80 card and CP/M
Gameplay and other fun stuff
Joystick and game paddles
Working with sound
Recording a movie
Transferring Apple II diskettes to the Mac
The A2V2 utility application
Advanced options
Working with character sets and international keyboards
Configuration
Controlling Virtual ][ with AppleScript
The Virtual ][ Inspector
Support
Getting support
Release notes
Other issues
Specifications of the virtual machine
Unsupported features
Why did I create this application?
Introduction
Virtual ][ is an application that emulates the
Apple II computer. Its main purpose is to enjoy, on your
Mac, the nostalgic fun of the Apple II.
Key features
- Emulates five different machines:
- The original Apple ][, released in 1977
- Its successor from 1979, the Apple ][+
- The Apple //c, introduced in 1984
- The enhanced Apple //c with 32KB ROM, introduced in 1985
- The enhanced Apple //e, released in 1985; the most versatile
- Supports USB game pad or joystick
- Save and restore snapshots of the virtual machine whenever you want
- Full support for dsk and woz disk images
- Full-screen mode
- The emulated machine can print to a pdf file
- Conversion of original diskettes to disk image files
- Integrated "Spotlight" module allows searching for a specific file on your Apple II disk images
More features
- Run multiple machines simultaneously
- Supports all graphics and text modes
- Emulates the internal speaker
- Mouse ][ emulation
- ProDOS hard disk support
- Thunderclock, "Mountain" AppleClock and no-slot clock
- Cassette tape emulation
- Memory expansion up to 16 MB
- Supports international keyboards and character sets
- Record a QuickTime movie from the emulated Apple II screen
- Intuitive user interface
- Realistic sound effects
- Comprehensive documentation
Advanced features
- Configure your own virtual machines
- Mount a Mac folder as a DOS or ProDOS disk
- Run CP/M on the emulated Z80
- Use real serial devices or a TCP connection with the emulated Super Serial card
- Paste text to the Apple II keyboard
- Install your own character generator ROMs
- Run the emulation at different speeds
- Debug Apple II programs with the "Inspector"
- Built-in performance monitor
- Can be controlled with AppleScript
Virtual ][ accurately implements the hardware of the original machine in
software, so all programs should behave like they did on the real machine.
The application requires macOS 12.0 "Monterey" or better. There are no
specific hardware requirements.
Note that, for copyright reasons, the application does not
include the original Apple ROM images. To obtain these, read
"About the ROM image file".
You can download and try an evaluation version of
Virtual ][ for free. If you like the application, you can
buy a license and enjoy the full-featured Apple II
emulation. Read more about this in "About the
evaluation version and licensed version".
About the ROM image file
Installing a ROM image file
The Apple II machines came with built-in software in ROM. This software is not
bundled with Virtual ][, but downloadeding and installing it is easy.
Step 1: Download the appropriate ROM image file(s)
The easiest way is to
download ROMs for all five supported machines in one zip file.
If the above link doesn't work, or if you prefer getting individual ROM files, you can find them on
archive sites,
or can search for ROM files with
DuckDuckGo or
Google.
Before installing, unzip any zip file by simply double-clicking it in the Finder.
Step 2: Copy the ROM image files to the right location on your system
In Virtual ][, select "Show ROM Folder" from the File menu. This opens a Finder
window showing the folder where the ROM files must go. Copy or move the ROM files there.

The file names do not matter much; the only requirement is that they end in ".rom" or ".ROM".
Virtual ][ automatically figures out which file to use for which virtual machine, based on
the file contents.
Step 3: Verify the installation
From the File menu, use "New Machine" to create an instance of the machine you want to
emulate. The application will search the
ROM folder for a file that matches the selected machine type. If no such ROM can
be found, it shows a warning.

If you updated from an older version
Before version 8.0, Virtual ][ allowed the ROM files to reside in the same folder as the application.
This setup does not work anymore, so move these files to the dedicated ROM folder.
Some technical details
In each Apple II, the memory address range from $D000
to $FFFF is occupied by ROM, containing the Basic interpreter (either
Integer Basic or Applesoft Basic) and the system monitor. In the
Apple //e and //c the memory range $C100 - $CFFF is also used
for ROM.
Virtual ][ needs a valid ROM image file to behave like a
real Apple II. Because the ROMs are copyrighted by
Apple, they are not bundled with Virtual ][. The ROMs
must be present as external files containing the exact memory image.
To be more precise: Virtual ][ uses the last 12 KB of
the designated file (or 16 KB in the case of Apple //e and //c) as
the ROM of a newly created virtual machine. The enhanced Apple //c
needs a ROM file of exactly 32KB.
If the application does not find a suitable ROM file, it uses a built-in ROM
image, which shows a message about the missing ROM (and also hides an easter
egg).
If you want to use a non-standard ROM, and know what you are
doing, you can override the standard ROM image file search, and
specify a ROM image file in the "ROM memory" section of the
configuration window.
Running a demo to further test the installation
After installing the ROM image files, you can see some examples of what Virtual ][ can do.
To that purpose, click on the Applescript menu, and select any of the "example scripts".

You'll see a short explanation of what the demo will do; click the "Run" button to start the demo.

If you want to learn more about using Applescript with Virtual ][, read
Controlling Virtual ][ with AppleScript
Where to find Apple II documentation
This Help file is about the Virtual ][ application. For example, it tells you how to
configure a virtual machine, how to use the emulated printer and how to work with disk images.
It does however not explain how to use the
Apple II computer. If you want to refresh your memory on
Applesoft Basic, Integer Basic, DOS or ProDOS commands, you might
find this web page useful: Apple ][
Programmer's reference. Or, if you want more detailed information,
have a look at this site; it contains
a large collection of Apple II manuals.
About the evaluation version and licensed versions
The application runs in one of three license modes:
- Evaluation mode; this is what you have when you first download
the application and run it. Most of the functions work, but the
application pauses every few minutes.
- Limited license mode: this lifts some of the restrictions of
the evaluation mode.
- Full license mode: this unlocks all features of the application.
This table shows the difference between the licenses:
|
|
Evaluation
|
Limited
|
Full
|
|
"Evaluation Version" watermark in screen
|
Yes
|
No
|
No
|
|
Pauses every few minutes
|
Yes
|
No
|
No
|
|
Full use of matrix printer emulation (no "Evaluation Version" watermark)
|
No
|
Yes
|
Yes
|
|
Serial I/O via TCP sockets or Unix named pipes
|
No
|
Yes
|
Yes
|
|
Make and restore machine snapshots at any time
|
No
|
No
|
Yes
|
|
Record a movie of the emulated screen
|
No
|
No
|
Yes
|
|
Mount a Mac folder as a ProDOS disk
|
Read only
|
Read only
|
Read & Write
|
|
Smart power management (as described in Setting the speed)
|
No
|
No
|
Yes
|
|
Available amount of emulated memory
|
128 KB
|
128 KB
|
16 MB
|
You can purchase a license in the online Virtual ][ store,
or with "Buy a License" in the application menu. If you purchase a limited license, you can upgrade to the full license later on.
A license gives you the right to run Virtual ][ on one computer at a time. You can install it on multiple
computers though.
Right after ordering the license, the online store sends you an e-mail
with the license code. Choose "Enter License Code" in the
Virtual ][ application menu, and enter (with copy / paste) the information
received in the e-mail.
When everything checks out, the application is upgraded to the licensed
version immediately. There is no need to stop and restart the
application.
Starting and stopping the application
Starting
There are two ways to start the Virtual ][
application:
- Double-click the application and work with a default
configuration, or
- Open a Virtual ][ configuration or snapshot.
In either case, the application requires a ROM image file to boot a
virtual machine. This is described in more detail in "About
the ROM image file".
Stopping
A virtual machine stops (is "switched off") when you close its window
(or when you stop the Virtual ][ application). The application
presents a sheet asking if it should make a snapshot of the running
machine. If you do, you can continue running the same machine later on by
simply opening the snapshot file.
Also see Saving and restoring machine snapshots.
Note that you can customize the starting and stopping behavior in the application preferences.
Saving and restoring machine snapshots
Virtual ][ lets you save and restore machine snapshots at any time (full-license only). This can be
useful, for example, if you encounter a critical point in a game, and want to make sure you can return to this point
in case your game character doesn't survive.
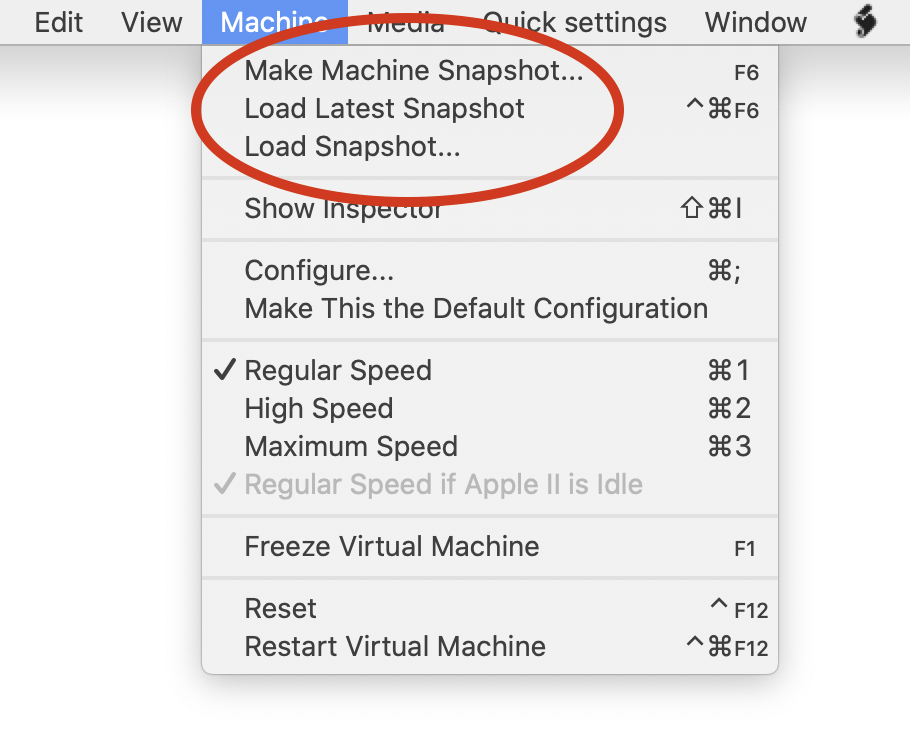
The "Machine" menu has the items you need to save and load snapshots. The virtual machine automatically pauses
while a snapshot is being made.
You can also open a previously saved snaphot with File -> Open, or by double-clicking the
snapshot file in the Finder. However, if you run a machine and want to go back to a previously saved
snapshot of the same machine, you should use one of the the "Load" items in the Machine menu. Using File -> Open in
that situation would fail because it would try to open a second machine using the same disk images.
Be aware that working with snapshots has a few limitations:
- Unsaved print output produced by the matrix printer emulation is not part of the snapshot. See "Using the printer"
to learn how to save the print output.
- The state of any mounted Mac folders is not part of the snapshot.
- It is not recommended to make a snapshot while data is being written to a disk (or tape). The data might end up
corrupt when the snapshot is restored later on.
General operation
The application's main window shows the Apple II screen on the left, and a
number of connected devices at the right. These devices depend
on the type of machine and any configuration options you may have chosen.
The Apple ][, ][+ and //e allow you to set up different devices by inserting and
removing peripheral cards, just like their original counterparts.
The Apple //c machines did not have slots for peripheral cards, and can be configured in
a more limited way.


The examples show a monochrome monitor, but the leftmost two buttons in
the toolbar make it easy to show a color monitor, or to change "green" to
a different color (such as amber).
When a virtual machine is started it waits for a boot diskette. If you want
you can skip the diskette boot by pressing Reset (control-F12 or
the Reset button in the toolbar).
Each device at the right serves as a button. The way these buttons and the devices
work is described in the next chapters.
The smaller buttons at the top of the peripherals section can be used to select
or create diskettes and other media.
Copying the screen to the Mac clipboard
The contents of the Apple II screen can be copied to
the Mac clipboard. This can be done in two ways:
- The regular "Copy" command puts the screen contents on the
clipboard as a picture.
- The "Copy as Text" command, also in the Edit menu, puts the
screen contents on the clipboard as text. This usually results in
exactly 24 lines of text. However, if the screen is in mixed text
/ graphics mode, only the 4 text lines are copied. The command is
unavailable if the screen is in full graphics mode.
Temporarily pausing a virtual machine
A virtual machine can temporarily be paused by selecting "Freeze
Virtual Machine" from the "Machine" menu, or by clicking the "Freeze"
button in the toolbar. You can later on resume with "Resume Virtual
Machine" or the same toolbar button. As a shortcut you can also use
the F1 key to pause / resume.
Setting the speed
Virtual ][ faithfully emulates the speed of the original
Apple machines, which ran at a CPU clock speed of 1 MHz. Maintaining this exact speed is
essential for programs that display animated graphics or produce sound.
There are however situations where it would be nice to have a faster
machine: while doing a lengthy calculation for example, or
when accessing a floppy disk. To this purpose Virtual ][
has three modes of operation, which you can choose from the Machine menu
or using the "Speed" slider in the toolbar.
- Regular Speed: in this mode, the virtual machine runs exactly at
the speed of the original machine. Use this for the genuine
Apple II experience.
- High Speed: if this is selected, the machine runs as fast as
it can, but falls back to regular speed when it writes output to the screen
or produces sound. This mode is suitable for game play: some things go
fast, like loading and initializing the game, but the game play itself runs
at regular speed.
- Maximum Speed: the machine runs as fast as it can, and only switches
back to regular speed when it must produce sound. This option is intended
for things like printing, disk copying, compilations and so on.
A different way to set the machine speed is in the CPU section of the machine configuration, where
you can set the machine speed with steps of 1 MHz.
If you have the full license version of Virtual ][, the high speed and
maximum speed settings come with a power management feature: while the Apple II is "idle",
in other words if it isn't doing anything useful, the speed is automatically reduced to "regular",
to conserve energy.
If you want, you can switch the power management feature off with the menu item
"Regular Speed if Apple II is Idle", in the Machine menu.
Note that the highest effective speed that can be obtained depends on your Mac,
on the number of simultaneously open virtual machines, and on other applications
running at the same time.
You can preserve battery power even further by selecting the option
"Pause virtual machines if minimized or hidden" in the "Power" section of the application preferences.
The option is switched on by default.
The Apple II keyboard

Key mapping
The built-in keyboard of the original Apple ][ and ][+ computer has
far fewer keys than your Mac keyboard. It even has hardly
enough keys to produce the entire supported character set. For
example, on the original machine the user had to press shift-M to
produce the character "]", and shift-N for "^". The characters
"[" and "\" could not be entered at all, although they could be
displayed on screen.
These restrictions do not apply to the Virtual ][
emulator. All characters in the Apple ][ character set
can be entered by typing the corresponding character on the Mac
keyboard. This implies that shift-M just produces a capital M, not a
"]".
The "soft caps lock" feature
The keyboard of the original Apple ][ and ][+ could
not be used to enter lowercase characters.
The Apple //e and //c keyboards were able to enter uppercase and
lowercase characters, but many programs still expected uppercase
input only.
To emulate flexible keyboard behavior, Virtual ][ has
the "soft caps lock" option. When it is on, the A-Z keys
produce uppercase characters, as on the original Apple ][
keyboard. When the option is off, these keys produce lowercase
letters (or uppercase with the shift key), as on the
Apple //e. This option can be toggled with the "Caps" toolbar
button.
Special keys
The Apple ][ had four special keys that did not
produce a character. Here is how they are emulated.

- Left and right arrow: these keys are emulated by the left and
right arrow keys on the Mac keyboard. The
Apple ][ keyboard did not have a "backspace" key, so
the left arrow key is the official way to move the cursor to the
left. In Virtual ][ you can also use the Mac
backspace key, but you have to activate this feature in the
keyboard configuration.
- Repeat key: The Apple ][ keyboard had no
auto-repeat feature, but it provided a specific key for this
purpose. This key is not implemented in Virtual ][.
Instead, it uses the auto-repeat feature of the Mac
keyboard.
- Reset key: This is an important key. It resets the 6502
processor and connected devices. On the Apple ][+, it
had to be pressed together with the control key, in order to
prevent an accidental reset. In Virtual ][,
function key F12 acts as the Reset key, and just like on the
Apple ][+, must be pressed together with the control
key. Another way to emulate the Reset key is to choose "Reset"
from the Machine pull-down menu or click the Reset button in the tool bar.
For reasons of compatibility with previous versions of
Virtual ][, ctrl-Backspace also acts as Reset, but
this only works for the Apple ][ and
Apple ][+, not for the Apple //e.
Additional keys on the
Apple //e and //c
The Apple //e and //c have a few additional keys.

- The up and down arrow keys are emulated by the same keys on
the Mac keyboard.
- The "Delete" key (located at the upper right of the
keyboard) is emulated by the Mac backspace
key, unless the option "Backspace is left arrow" has been set in
the keyboard configuration. In the latter case the Delete key is
not available.
- The Solid Apple key is mapped to the Mac "alt"
key. Note that there can be a conflict here when you need the alt
key to enter a specific character on the Mac keyboard. In that
case, no "Solid Apple" will be sent to the virtual machine. For example,
on a Mac with a French keyboard you must type alt+` to get the
character @ (this goes for any Mac application, not just Virtual ][).
So on such a keyboard it is not possible to enter the combination "Solid Apple-@" in the
virtual machine. On US and European ISO keyboards this limitation does not exist, because
the alt key is never needed to type any of the standard ASCII characters.
- The Open Apple key is mapped to the Mac "Command" key. However, there are some special
considerations for entering Command key combinations, such as Command+C. By default these combinations
are handled as in any Mac application: they activate a menu shortcut if one is defined or do nothing otherwise.
If you use an Apple II program that works with Open Apple key combinations, you can tell
Virtual ][ to disable its menu shortcuts, and forward all Command-key combinations (as well as
control-key combinations) to the virtual machine. To enter this mode, press the F5 key,
or use the "Quick settings" menu.
Note that the option goes for all open virtual machines, even for machines that do not support the Open Apple key.
Also note that a few Command key combinations are handled by the system, such as Command-Tab. These key combinations
cannot be forwarded to the virtual machine.
Pasting the Mac clipboard
If the Mac clipboard contains text, it can be pasted into
the virtual machine. The effect is as if each individual character
were typed on the keyboard. This "typing" occurs as fast as the
virtual machine can handle the characters, so no characters are
lost in the process. If the Apple II is not reading the
keyboard when the text is pasted, the text remains queued. Manual
input is disabled as long as a pasted text is being entered into the
virtual machine. A "newline" character in the text is converted
to the Apple II "Return" key.
Working with disk images
Overview
A disk image is a representation, in a single Mac file, of an entire floppy disk or
hard disk. Apple II disk image files come in several different formats; the next table
shows the formats Virtual ][ supports.
|
Disk image type
|
File extension
|
Description
|
|
5.25" diskette, 16 sectors per track
|
.dsk, .do, .po
|
A regular diskette with 35 to 40 tracks, used with DOS, ProDOS,
UCSD Pascal or CP/M. The size of the disk image file is 140 KB for
a 35 track disk, up to 160 KB for a 40 track disk.
|
|
5.25" diskette, 13 sectors per track
|
.d13
|
A diskette with 35 tracks of 13 sectors each, as used in Apple DOS before version 3.3. This format
is not widely used, and Virtuall ][ supports it in a limited way. Any changes made to
the mounted disk, such as new or modified files, are lost when the disk is ejected from the drive.
It is recommended to use the .woz format if you want full read and write access to 13-sector disk images.
|
|
5.25" diskette, exact replica of real diskette
|
.woz
|
Stores the data in exactly the same way as a real Disk ][. The format is suitable for both
regular and copy-protected disk images. The size of a .woz diskette image is typically
between 200 KB and 250 KB. Virtuall ][ supports both version 1 and version 2 of the Woz file format.
|
|
Copy protected 5.25" diskette
|
.nib
|
A disk in so-called "nibbilized" form. This format supports some copy-protection schemes, but
has some serious limitations (unlike the .woz format). The size of a nib image is 232960 bytes for a
35 track disk, up to 266240 bytes for a 40 track disk.
|
|
Copy protected 5.25" diskette (proprietary and deprecated)
|
.v2d
|
A proprietary format, capable of supporting many features of the Disk ][,
including "half-tracks" and tracks of non-standard length. The format is compatible with
the "D5NI" format used by one of the first Apple II emulators, "Stop
The Madness". You won't find disks with this format on internet.
It has been made obsolete by the .woz disk image format.
|
|
Compressed 5.25" diskette
|
.gz, .gzip
|
Any of the above diskette types, compressed with the gzip utility. Many internet
archives offer diskettes in this form, to save space and bandwidth. Such files can directly
be used in Virtuall ][, without the need to expand them first.
|
|
3.5" diskette
|
.po
|
Typically 800KB in size; contains the disk sectors in ascending order. Usually intended for use in ProDOS.
|
|
Hard disk or 3.5" diskette
|
.2mg, .2img
|
A widely used, universal disk image format.
|
|
Hard disk or 3.5" diskette (legacy format)
|
.hdv
|
A disk format based on one of the Mac Classic DiskCopy formats,
"NDIF R/W". If you have DiskCopy disk images, there is a good chance you can convert them to the .hdv
format by selecting "Convert Legacy Disk Images" from the Media menu. This starts a
utility application that allows you to select one or more disk image files and then tries to
convert them. If successful, the converted disk images are saved with the ".hdv"
extension in the same folder as the original. The original disk images remain untouched.
Note the conversion works one-way only.
For the technically interested: the hdv format is extremely straightforward: it just contains
all 512-byte disk blocks in ascending order.
|
Apart from disk images, Virtual ][ also lets you mount a Macintosh folder as an
Apple II floppy disk or a ProDOS hard disk; this provides a way to
copy files from one environment to the other.
Converting original Apple II diskettes to disk image files
Many disk images with original programs are available on internet, but Virtual ][ can
also help you converting your own Apple II diskettes to disk images, using the A2V2 utility application.
If you still have an original Apple II with a working disk drive,
Virtual ][ can help you converting original diskettes to disk image files.
To this purpose, select "Convert Apple II Diskettes" from the "Media" menu. This will
start a separate application, named A2V2 (short for Apple II - Virtual ][).
Read the application's Help section
to learn how to do the conversion. A2V2 can convert in both directions:
from diskettes to disk image files and vice versa.
Because the capacity of an Apple II diskette is very small by todays standards
(typically 140 KB), you might end up with many diskette image files. Virtual ][ offers
several ways to keep track of the diskettes and their contents. These options are discussed below.
Organizing your disk image files: create a "favorite disk folder"
One way to organize your disk images is putting them in one folder
(with subfolders as necessary), and make this the "favorite disk folder" in the
Virtual ][ preferences. You can use the "Disks" button in the toolbar to open
the folder in the Finder and drag a disk to an empty Virtual ][ disk drive.
Organizing your disk image files: the "search" window
A powerful feature of Virtual ][ is a built-in search window. It lets you
find the disk images that contain an Apple II file with a specific name, no matter where these
disk images are on your Mac. This works for diskette images as well as hard disk and 3.5" disk image files.
This feature relies on Apple's Spotlight technology, so the disk image files must be in folders that
are included in the Spotlight search (by default your entire home folder and everything in it).
Note that some copy-protected diskettes may have a non-standard structure, and therefore cannot be searched by Spotlight.
To use the feature, select "Search Apple II Disk Images" from the "Media" menu.

If no disk image files appear at all, or when you feel there should be more disk images than
are actualy shown, choose "Import Disk Images in Spotlight" from the Application menu. The search window
will be updated while new disk images are found.
Initially, the window shows you all disk images belonging to the selected file systems (DOS, ProDOS, etc.).
You can narrow down the displayed collection by typing (part of) an Apple II file name
in the search field and pressing return.
For example, suppose you want to find all Apple II files that have the term "adventure" in their name. Open
the search menu, type the word you are looking for, and press return. This is what might appear.

Apparently, these disk images all contain one or more files with the requested name. To insert one of the disks
in an emulated floppy disk drive, double-click it, or drag it to a disk drive.
Because the search mechanism uses the Spotlight feature, you can also search disk images without
starting Virtual ][, by just typing a file name in the system-wide Spotlight search field.
Selecting one of the disk images from the Spotlight menu launches Virtual ][ with
the selected disk inserted.
Note that when you select a disk image file in the Finder, and open the "Info"
window, it shows you the Apple II file system.

Searching for disk images in the Terminal
Advanced users can make command-line Spotlight queries. For example, to list all woz2 disk images on your Mac, open a
Terminal window and do:
mdfind 'kMDItemFSName == *.woz && * == woz2'
You can use the mdls tool to find what other meta data is stored for a specific disk image.
Quickly inspecting your disk image files using "Quick Look"
Virtual ][ contains a module for the macOS Quick Look feature. It is installed
automatically with Virtual ][, and allows you to quickly inspect the contents of most
Apple II diskette and hard disk images. In the Finder, select a disk image and press the space
bar.
The quick look shows the diskette with an 1980's style label, and the names of the files on the diskette. It also
shows the file system, such as DOS or CP/M.

Write-protecting a disk
An Apple II diskette could be write-protected by closing its "write-protect notch" with
a piece of tape. In Virtual ][ this can be done by selecting "Set Disk Properties..."
from the Media menu. This not only works for diskettes, but also for hard disk images.
As with the original Apple II, you can change the write-protect state only while the disk
is not inserted in the drive.
Alternatively, you can select the disk image file in the Finder and set its "Locked" property in
the Info window.
Setting volume numbers of DOS and ProDOS diskette images
In Apple II DOS and ProDOS, diskettes have a volume number, which is assigned when formatting
the diskette. Disk images with the .woz extension store this volume number. However, diskettes
images with file extension .dsk, .do and .po. do not;
they only contain the diskette data. For that reason they are assigned the default
volume number 254 when you insert them in a disk drive.
This default volume number works fine most of the time, but sometimes Apple II software
requires a specific volume number in order to run. To make this possible, Virtual ][
allows you to set the volume number by selecting "Set Disk Properties..." from the Media menu.
You can only change the volume number for diskettes while they are not inserted in the disk drive.
Thechnically, the volume number is stored as a so called "extended attribute" in the Mac file system.
Using the floppy disk drives

Supported disk image formats
The original Apple Disk ][ accepts 5.25" diskettes with 35 tracks.
However, it was possible to move the disk drive arm to track 36, and some copy protection schemes
actually relied on this. Furthermore, disk drives existed (not made by Apple) that supported
40 tracks. In order to support a wide range of disk formats, the disk drive emulation of
Virtual ][ supports up to 40 tracks.
The 5.25" diskette image formats supported in Virtual ][ are listed here.
Apart from disk images, the disk drive accepts a Macintosh folder to be mounted as a DOS 3.3 diskette.
This feature is described in more detail below.
Inserting and removing a disk
In order for a disk image to be inserted in a disk drive it must
have the appropriate file extension.
Inserting a disk can be done in several ways: one is to click
the appropriate media button at the top of the peripherals section and then select the
disk image and the target drive in the file open panel that appears.
The same file open panel appears when selecting "Insert Diskette Image" from the
"Media" menu, or the menu that appears when you click an empty disk drive.
In the file open panel you will also see a checkbox to make the disk
image a part of the configuration. This means that when you save the
configuration and later re-open it, the selected disk image is
already inserted in the disk drive. This allows you to make a
"turnkey" system, which automatically boots from an already inserted
disk.
A different way to insert a disk is to simply drag the disk image file or shared folder from
its Finder window (or from the disk search window) to an empty disk drive.
An empty disk drive can be recognized by the opened drive door. Using
this technique, you can still make the disk part of the configuration by
holding down the "alt" key while dropping the file or folder.
The third way to insert a diskette is to double-click its icon in the
Finder or the disk search window.
When double-clicking a disk image, Virtual ][ will be started if it isn't
already running. The diskette is inserted in the disk drive with the
highest slot number and the lowest drive number. This is the disk drive
used for booting the machine, so effectively you can boot a DOS session by
double-clicking the DOS boot diskette.
If Virtual ][ already runs when you double-click the
diskette image, it will be inserted in any free disk drive. When no such
drive is available, a new virtual machine will be created.
A disk can be removed by clicking the disk drive or by using "Eject Disk"
in the Media menu. Note that a
disk can be removed while it is being used for I/O; as you may guess,
this is not recommended, as is the case with a real Apple II.
If the disk image or mounted folder is part of the configuration, the
application presents a confirmation dialog. Ejecting the disk removes it
from the configuration.
Creating a new disk image
A new, uninitialized disk can be inserted by clicking the "new
disk" media button, or by clicking an empty disk drive and selecting
the proper option from the menu that pops up.

A blank disk must be initialized by the Apple II operating
system before it can be used.
Mounting a Mac folder as a diskette
A Mac folder can be mounted as a DOS 3.3 diskette. This way
you can share files between a virtual machine and the
Mac environment. When you mount the folder its files are converted
to Apple DOS format (if necessary) and stored on
a temporary (in-memory) disk image, which is inserted in a disk
drive. When you eject the diskette, any modifications are copied back
(with conversion as necessary) to the Mac folder.
This approach implies that the mounted Mac folder is limited to
what DOS 3.3 allows:
- Combined file size not more than ca. 192 KB;
- No subfolders, just files;
- File names at most 30 characters, starting with a letter, and containing no commas.
Virtual ][ ignores any files that do
not meet these requirements.
In Apple DOS every file has a file type, such as A(pplesoft
Basic), I(nteger Basic) or B(inary). In order to handle the files
correctly, Virtual ][ must be aware of the DOS file type
of every shared file. Furthermore, some files need conversion. A text
file for example has different representations in Apple DOS and in
macOS, so if you want to edit a DOS text file in the macOS
environment Virtual ][ can convert it for you.
When you use an Apple DOS program, such as FID, to copy files from
a diskette to the mounted folder, Virtual ][ tries
to assign the correct file types and conversion rules. If the Mac folder
contains files with unknown DOS file types, Virtual ][
presents you with a panel where you can specify the missing types.
You can also open the panel by selecting "Assign Apple DOS Types"
from the "Media" menu. This is what it looks like:

The list presents all files and folders in the selected folder.
Invalid files are marked with a little red cross, as are folders.
Valid files that have already been assigned a DOS type have a green
dot. Files that have never been assigned a DOS type appear with the
exclamation mark icon, and are assigned type Binary by default.
You can use the popup menus in "Type" and "Macintosh Format" to
change the settings. The next table lists your options:
|
DOS Type
|
Mac Format
|
Address
|
|
B (Binary)
|
No Conversion: the file is stored in the Mac folder
exactly as it is stored on the DOS diskette, including
its 4-byte prefix.
|
Not applicable
|
|
B (Binary)
|
Strip Prefix: in Apple DOS, binary files have a
4-byte prefix, containing the load address and the length of
the file. With this option, the prefix is stripped from the
stored Mac file.
|
This specifies the load address to be used when
converting the file from Mac to DOS format. You can enter a decimal
number or a hexadecimal number preceded by '$'. So for
example $2000 is the same as 8192.
|
|
T (Text)
|
No Conversion: the file is stored in the Mac folder
exactly as it is stored on the DOS diskette.
|
Not applicable
|
|
T (Text)
|
Macintosh Text: in Apple DOS, text files are encoded
differently than on Mac. Select this option if you
want to be able to edit the text file in the macOS
environment.
|
Not applicable
|
|
A (Applesoft Basic)
I (Integer Basic)
R (Relocatable)
S (Undefined)
X (Undefined)
Y (Undefined)
|
Always stored without conversion.
|
Not applicable
|
Virtual ][ remembers the file types and conversion
rules you assign, and it automatically uses these settings the next
time the folder is mounted.
Note there are some special considerations when using shared
folders:
- While a folder is mounted, you should not use another macOS application
to make changes to the corresponding Mac files. If you do, all
changes will be lost as soon as the diskette is copied back to the Mac
folder.
- It is possible, though not recommended, to re-format a mounted
folder diskette with the INIT command. However, this reduces the capacity
of the diskette to 140 KB.
- If a DOS file name contains the "/" character, the name
cannot be used on macOS. In that case Virtual ][
converts the file name by changing all "/" to "\", and putting
another "\" in front of the file name.
- Virtual ][ supports so called "sparse text
files". This feature is used in Apple DOS to store random access
files in a space-efficient way. A side effect is that such a file
can appear to be be much larger in the Mac folder than it is
on the DOS diskette.
Hard disk and 3.5" floppy disk drive
NOTE: this feature is not available on the original Apple //c,
it is available on the Apple //c with 32KB ROM though.

General description
Hard disks and 3.5" floppy disks share the same technical characteristics, and
Virtual ][ supports both with an imaginary type of emulated disk
drive, called "OmniDisk". This device can handle disk images
of any size up to 32 MB (the maximum supported by
ProDOS), including 400 KB and 800 KB floppy disk images.
The hard disk / 3.5" disk image formats supported by Virtual ][ are
listed here.
The OmniDisk also accepts a Mac folder to be mounted as a ProDOS hard disk.
This allows for a convenient way to exchange files between the Apple II
and Mac environments. Note this feature requires a full license to be fully functional.
Setting up hard disk drives
You can connect one or more OmniDisk drives to the virtual machine with the
Configuration panel.
If the machine has slots, first "insert" a SCSI card, preferably in slot 7 or slot 5. Then
connect one or two OmniDisk drives to the SCSI card.
For the Apple //c, which has no slots, the configuration panel has check boxes
to select one or two OmniDisk drives.
Using the hard disk and 3.5" floppy images
Disk images can be inserted and ejected just like floppy disk
images. The only difference is you use the OmniDisk buttons in the devices
view.
Using a Mac folder as a ProDOS hard disk
A Mac folder can be used as a ProDOS disk by "inserting" it in
an OmniDisk drive. You can do this in two ways: either choose "Mount Folder as ProDOS Disk"
from the "Media" menu, or simply drag a folder from the Finder to an empty
OmniDisk in Virtual ][.
A few restrictions apply to the mounted folder:
- The total folder size must not exceed 32 MB;
- Individual files are limited to 16 MB.
These restrictions are imposed by the ProDOS system. If Virtual ][ detects
that these conditions are not met, it will refuse to mount the folder.
While the folder is mounted, it is not accessible from the Finder. You'll
notice the icon gets a lock and a "no entry" sign to indicate this.

Note: if the folder is iCloud-based, only the
Finder lock may be applied, depending on your macOS version.
In that case you can open the folder in the Finder, but it is still protected from being modified.
The restricted access to a mounted folder is lifted when you eject the disk by clicking the OmniDisk icon.
From that point you'll have full access to the folder again in the Mac environment.
So what if Virtual ][ crashes while a folder is mounted? In that case the disk wasn't ejected,
so the folder is inaccessible, and you won't be able to mount it again. To solve this, Virtual ][
has an option to reset the state of a mounted folder; you'll find it in the "Media" menu as "Reset Mounted ProDOS Folder".
Use it in case of emergency only!
To use the mounted folder, you must boot the virtual machine from a ProDOS system disk.
Every file and every folder in the mounted folder will be present on the ProDOS disk; any
changes made on the ProDOS disk (like making new files and directories or changing existing files) result
in the same change in the Mac folder. Note that a Mac file might have a name
that is not allowed in ProDOS; in that case Virtual ][ composes an alternative
name for use in ProDOS, but this name will be as close to the original as possible.
The contents of text files are treated in a special way: the Apple II software expects each line
to end with a carriage return character (ASCII 13), whereas macOS uses a linefeed character
(ASCII 10) for this purpose. Virtual ][ sees to it that these codes are automatically converted
between the Mac and ProDOS environments.
All non-text files are stored in the Mac folder without any conversion.
If the virtual machine deletes files or directories on the shared folder, the same items are deleted from the Mac
folder. However, as you would expect on the Mac, they are not deleted right away, but moved to the trash.
The mounted ProDOS folder disk is practically 100% compatible with a "real" ProDOS disk. You can even
install the ProDOS system on it, which will give you a bootable disk. The only thing not
supported is making a full disk copy (block-by-block) of any ProDOS disk to a mounted ProDOS
folder disk. An attempt to do so will result in an error message.
You can store the state of a virtual machine while a folder is mounted as a ProDOS disk; if you do, the
folder will keep its access restrictions, because making any changes to the folder would render the saved
state invalid and useless. When you open the saved state later on, the folder is mounted automatically and
you can continue where you left off.
Finally, the mounted ProDOS folder feature is only fully functional with a full Virtual ][ license.
Without the license you can mount a Mac folder read-only; you cannot write to it.
ProDOS file types and subtypes - some technical background
The ProDOS "catalog" command shows file types and subtypes.

Although the file type is shown as a 3-character code, it is internally stored as a number between 0 and 255. For
example, file type 4 is a text file (ProDOS shows it as "TXT"); file type 252 is a Basic program (.BAS). When mounting
a Mac folder as ProDOS disk, this is how Virtual ][ determines each file's type:
- If the Mac file has an extended attribute named "prodos.FileType", its value (one byte) is used as
the ProDOS filetype.
- If the Mac file does not have this extended attribute, Virtual ][ checks if the file name
ends in an extension that matches a ProDOS file type, such as TXT, BIN or $FE. If so, the extension is used
to determine the ProDOS file type, and rest of the Mac file name is used as the ProDOS name.
- In all other cases, the ProDOS file type is 0 (displayed as $00 by ProDOS).
Note that using the "prodos.FileType" extended attribute makes the shared folder compatible with files extracted from a
Shrinkit archive by Shrink-Fit X, a
utility app to expand shk archives.
If the virtual machine creates a new file on the shared disk, it assigns a file extension based on the ProDOS file
type; it does not create the "prodos.FileType" extended attribute.
The ProDOS subtype is a 16-bit integer number. Its meaning depends on the file type.
For example, for binary files it indicates the load address; for random-access files it represents the record length.
Virtual ][ stores the auxiliary type as extended file attribute "prodos.AuxType" (this is compatible with
Shrink-Fit X). If a Mac file does not have this extended attribute, a default value is assumed.
Using the printer

General description
Virtual ][ supports four different emulated printers:
- Epson FX-80;
- Apple ImageWriter II;
- A simple "text only" printer;
- Printing to the macOS clipboard.
The printer is represented by a "Printer" button in the peripherals section.
While the Apple II is printing, the green light on the
printer blinks. When you press the button, the printer goes offline and
the application shows a print preview. You can also click the button with
the "alt" key held down: this just sets the printer offline without
showing the preview. Pressing the button a second time sets the
printer online again.
The Epson FX-80 printer
NOTE: the Epson printer is not available on the Apple //c virtual machines.
The Epson FX-80 was a very popular printer in the 1980's, and is
therefore supported by many Apple II programs.
A printer on the Apple II must always be connected via a printer
interface card. When you want to use the Epson printer, use the Configuration panel
to insert an emulated Grappler+ card, preferably in slot 1. Then connect the Epson printer to it.
The emulation supports most of the functions of the original printer,
such as different character pitches, bold, italic and underlined
text, margins, tabs, and graphic modes. Actually the only feature
not supported is printing proportional characters.
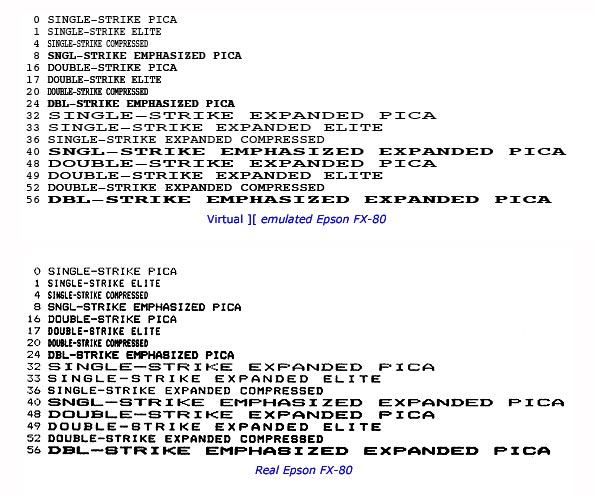
The technology used by the emulator for text rendering is very
different from the technology used in the original Epson. As a
result, the characters are somewhat different, but the size and general
looks of the characters are just like the real thing, as this example shows:
Apart from all Epson built-in character types, the emulation is
also able to print graphics. This allows you to run a program like
Broderbund's PrintShop. The print shown here was created with the built-in
Printshop demo in the Applescript menu of Virtual ][.

Using the Epson printer is straightforward. While the
Apple II is printing, the green light on the "Printer"
button blinks. When printing has finished, click the Printer button
to see a preview.
While the preview is open, the emulated printer is offline, so the
Apple II will hold new output. The printer comes back
online when the preview sheet is closed.
The preview shows the printed output on one or more pages of fanfold
paper. The length of one page can be chosen in the Printer section of
the Configuration panel, and is 11 inches by default.
Two blue triangles, on the left and right hand side of the paper,
indicate the "current position": this is where the next line of
output will appear.
At the bottom of the sheet are a few buttons:
- Tear Off and Delete: this clears the output without saving it
and closes the sheet.
- Tear Off and Save: this button saves the print output in a pdf
file. It then clears the print output from the preview and closes
the sheet. So this is like tearing off the fanfold
paper and storing the output in a safe place.
- Close: the preview is closed; the printed output is not affected.
After saving the output to a pdf file you can use Apple's Preview
application to view the output or print it on a real printer.
The "Action" menu in the preview sheet contains a number of
special options.

- Skip Page is like the "Form Feed" button on the real Epson: it
skips to the top of the next page.
- Skip Line moves the paper forward one line, like the Line Feed
button on the original printer.
- Auto Linefeed toggles the printer between two modes. When
"Auto Linefeed" is "on", every carriage return character also
advances the paper one line; when it is "off", carriage return
just moves the print head to the left margin. Normally, the
printer interface card takes care of generating the appropriate
control characters, and therefore the recommended setting is "off".
When you find that the Apple II software prints
all lines on top of each other, try switching this option on and
print again.
- Use 8th Bit is another technical option. When it is activated,
all 8 bits of every byte are sent to the printer; when switched
off the high order bit of every byte is ignored. This option
should normally be off.
- Hex Dump Mode puts the printer in a special state: it prints
all received bytes as hexadecimal numbers. It can be used for debugging
purposes. On the original Epson printer this mode was activated by
holding down the form feed button when turning the printer on.
Choosing this option clears the print output and closes the sheet.
- Reset Printer puts the printer in the initial state, as if it
were just switched on. It also clears the print output and closes
the preview sheet.
The Printer section of the Configuration panel
lets you set additional printer options, corresponding with the
"DIP switches" in the original printer.
Be aware that some Apple II applications need some tweaking of these settings. For example, the
number of bits in the connection (7 or 8) can make a big difference. Most applications only
work with 7 bits, but some need 8. The best way to go is experimenting a bit with the settings
until the output looks as expected.

The ImageWriter II printer
From a user perspective, the ImageWriter II is very much like the Epson FX-80.
Both are capable of printing text in different styles, and both can print graphics. From
a technical perspective however, the printers are quite different. As a result,
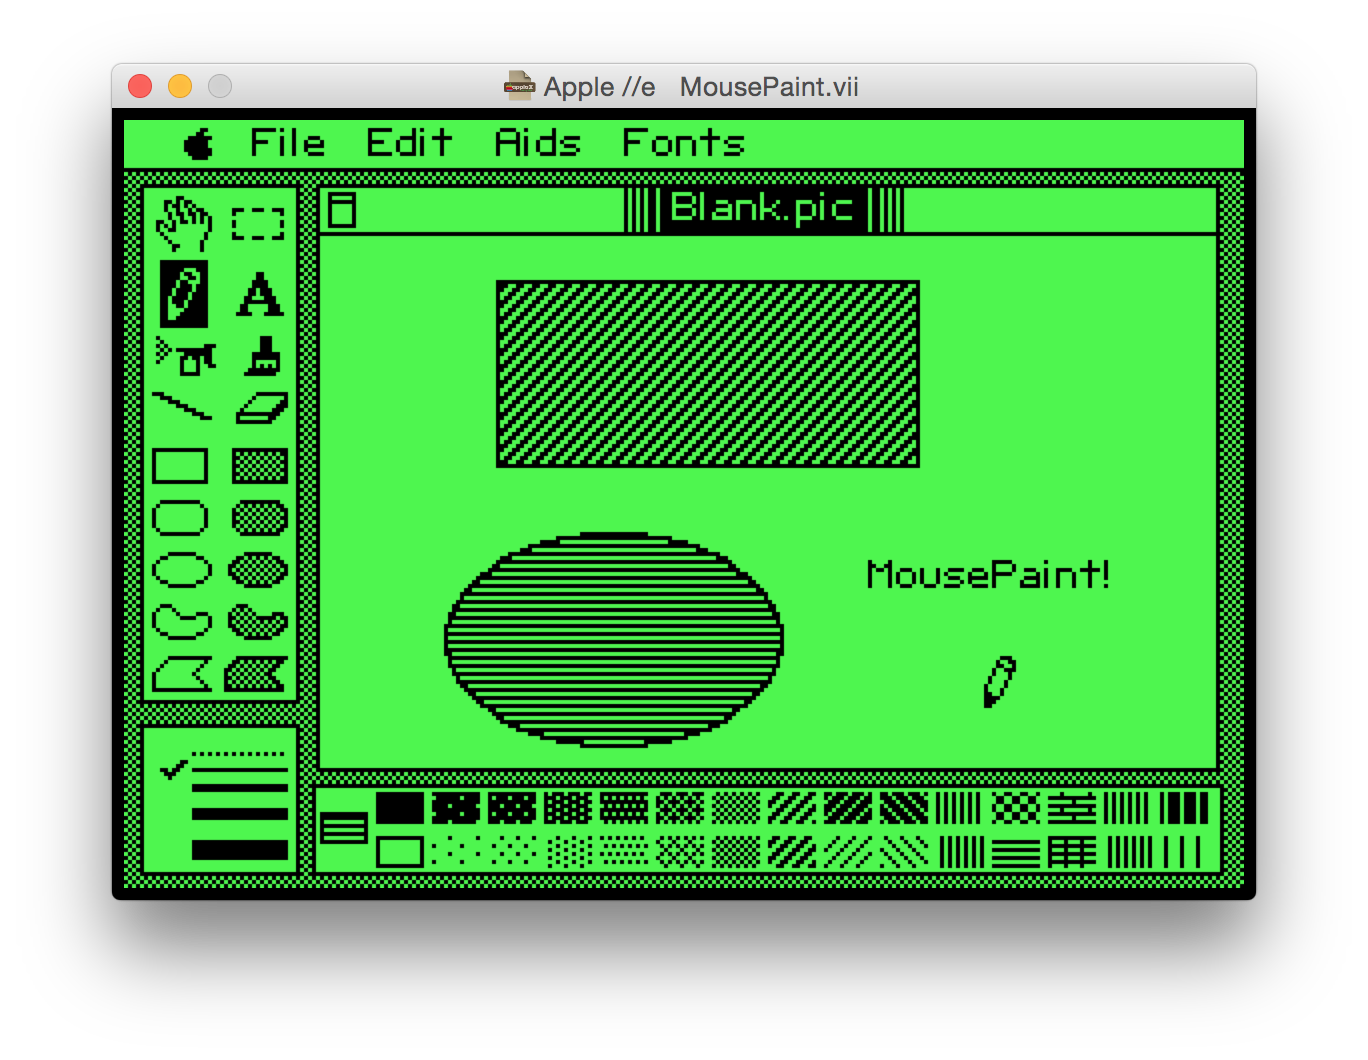
some Apple II programs are compatible with just one of these printers. For example
the "MousePaint" program, which came with the Apple Mouse, can only print on the
ImageWriter, not on the Epson.
The ImageWriter II printer must be connected via a serial interface card.
Use the Configuration panel to
insert an emulated Serial Printer card, preferably in slot 1. Then connect the
printer to it.
The ImageWriter II did have a unique feature, not found in the Epson, namely the
ability to print colors when a color ribbon was installed. This feature is fully
supported by Virtual ][.
The ImageWriter II allowed the user to select three different print
qualities: draft, correspondence, and near letter quality (NLQ). The emulation only
supports the "correspondence" setting, which is the most versatile and has less
restrictions than the other two. Note that text is printed with the macOS font
rendering engine, which in practice gives even better results than NLQ on the
original printer.
Operating the ImageWriter in Virtual ][ is identical to operating
the Epson priner, so refer to the previous section for details.
The simple "text only" printer
NOTE: the text only printer is not available on the Apple //c virtual machines.
This printer can be connected to either the Grappler+ or the serial printer card.
It writes all printed output to an
ASCII text file. When printing is finished, or even during printing,
you can open the file and process it in whatever way is useful. The
name of the printer file is of the form "Printer x - slot y.txt". In
this name, x is simply a number starting at 1; y is the slot number
the printer is connected to. All printer files are created on the
desktop; the location cannot be configured. If a printer file with
the same name already exists, new printed output is appended to the
end of the file, so in effect the printer file is like an infinite
supply of fanfold paper. When a virtual machine is closed the
corresponding printer files that are still empty are removed, so the
desktop will not be cluttered with empty files.
The easiest and safest way to inspect the printed output is by
clicking the "Printer" button in the peripherals section. First, this
button places the emulated printer in the "offline" state, so the
virtual machine will hold new output until the printer goes
online again. Next, the corresponding output text file is opened in
TextEdit. To continue printing, close the text file and press the
"Printer" button to put the printer online again.
Printing to the Mac clipboard
You can temporarily override the current printer by selecting "Print to Clipboard"
from the Edit menu. While this mode is in effect, all printed characters go to
the Mac clipboard, so they can be pasted in a text editor or word processor
after printing has finished. Be aware that clipboard printing is only intended for
ASCII text output. For example, it can be used to make a text copy of an Applesoft Basic
program; first list it to the clipboard printer, then paste it into a Mac
text editor. The "print to clipboard" mode is terminated by selecting the same menu
option again.
The serial interface
NOTE: the serial port is not available in the Apple //c virtual machines.
Introduction
In the early 80's, a serial connection was a popular and relatively straightforward way to
connect the Apple II to another computer. This could either be a local computer, directly
connected with a serial cable, or a remote computer, accessible via a dial-up modem. There was
no Internet back then, but a network of bulletin board systems (BBS's) existed
that allowed their members to log on using a modem.
Serial port emulation
Virtual ][ emulates the Apple Super Serial card (SSC), which was the de
facto standard for serial communication on the Apple II. This card implemented the universally
accepted RS-232 standard.
The SSC emulation can be connected to the "real world" in several ways:
- Through a TCP socket. This is easiest way and allows you to connect to internet hosted BBS's.
- Via a real serial port on your Mac, using an USB to RS-232 adapter.
- With Unix named pipes.
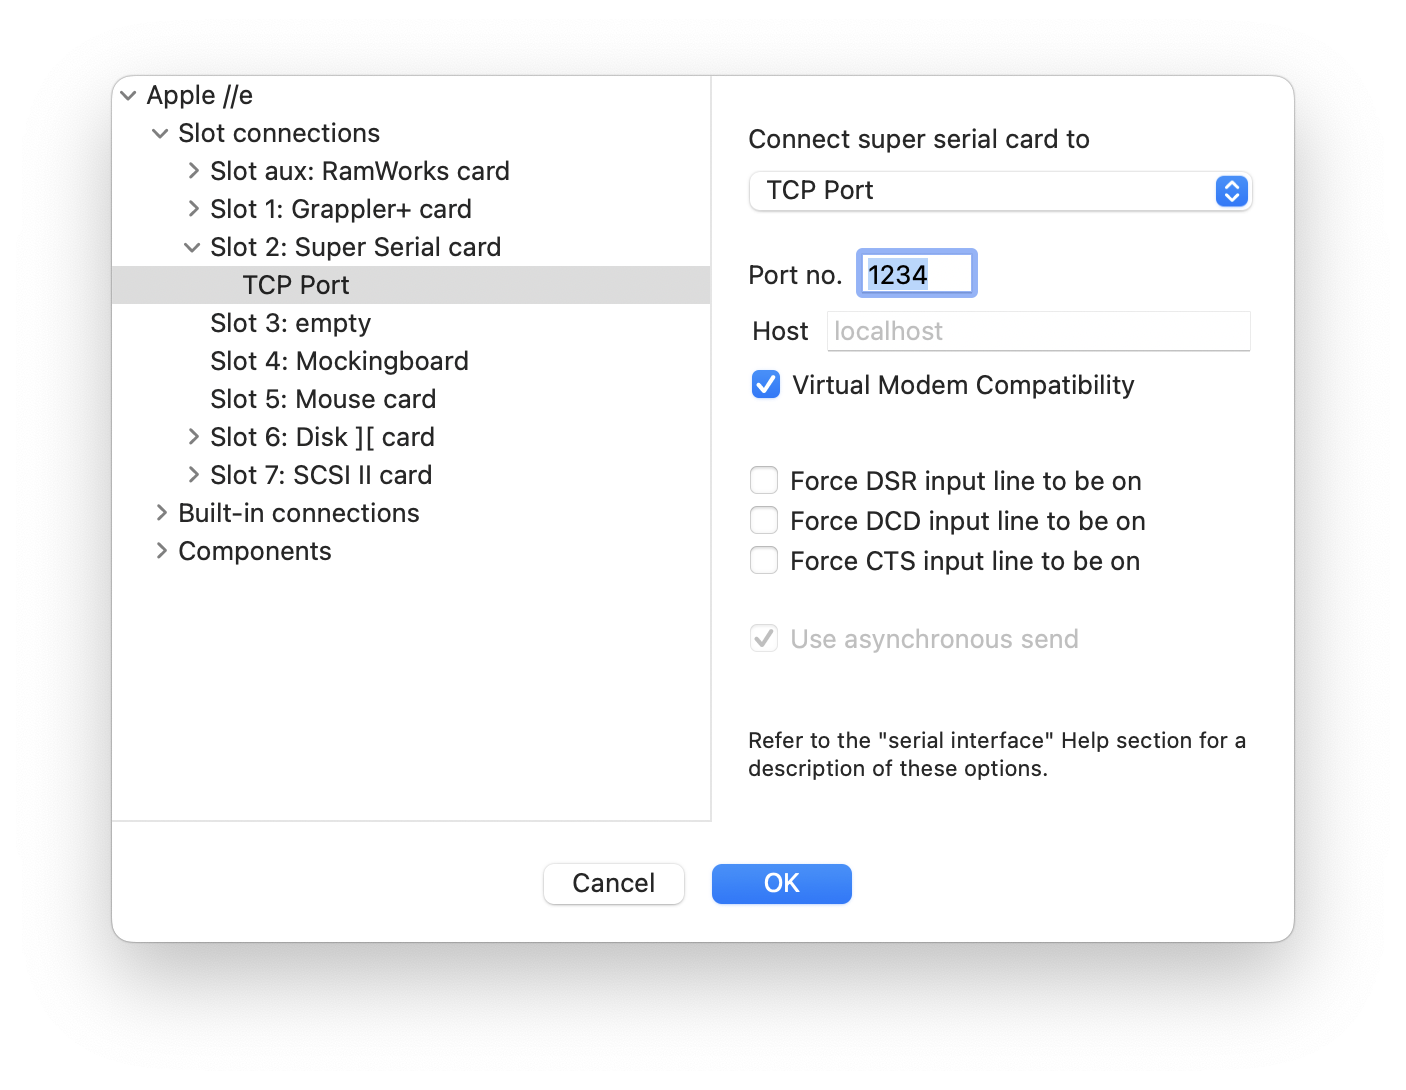
The Virtual ][ configuration panel has a pop-up menu with the
serial connections available on your Mac.
When you select the TCP option, you have to enter the port number to which the SSC connects, and optionally
the host name or IP address.
If the target is a virtual modem, such as tcpser,
check the "Virtual Modem Compatibility" option.
This allows Virtual ][ to optimize the commnunication.
The other items in this window are described below under "advanced options".
When the Super Serial card has been configured as described above, Virtual ][ shows a
status panel in the peripherals section, and also enables an item in the "Machine" menu to log the data
sent and received.

The status panel shows the RS-232 signals, as described in
this Wikipedia article.
The signals are presented as seen from the standpoint of the Apple II, so "RD"
indicates the Apple II receives data, and "TD" means the Apple II is transmitting data.
Clicking the little button shows a pop-up menu to open or close the connection and select some advanced options.
Advanced serial communication options
The "Force input line" checkboxes correspond to three RS-232 signals:
Data Set Ready, Data Carrier Detect, and Clear To Send.
These signals tell the SSC something about the status of the connected device. For example,
the DCD signal is set by a modem when it has a connection over a phone line with another modem.
When the Apple II sees this signal, it can start sending data.
If you make a connection to a real or virtual modem, these lines will probably be activated automatically.
In some situations however it may be necessary to force them "on". An example would be when using an RS-232 cable
that does not have the DSR pin connected. The Apple II software would not be aware of a device
connected at all, so DSR must be forced set.
The CTS signal is used for hardware handshake and should usually not be forced ON.
More information on these signals can be found in Wikipedia.
The "asynchronous send" option controls a timing aspect. It is on by default, and can only be
switched off for a real serial connection (via the USB port of your Mac).
When switched on, each byte sent by the SCC is handled by macOS in the background, allowing the virtual
machine to continue immediately. macOS sends the data whenever it has the opportunity to
do so. This means there is a (probably small) delay between the Apple II sending the byte
and the device at the other end of the line receiving it. Usually this works fine, and
this approach results in a throughput that is almost identical to the original Super Serial card.
However, there are situations where the asynchronous approach fails. For example, consider a situation
in which the Apple II sends characters to a printer, and briefly pauses after each "newline"
character in order to give the printer time to move the paper. In that case, the
asynchronous mode would not work, because the Apple II should pause after the newline character
has been received by the printer.
The way to accomplish this is using the synchronous mode: the Apple II will not send
the next byte until the current byte has been delivered to the other side.
Be aware that synchronous mode causes overhead and considerably slows down the output stream.
Configuring the Super Serial Card
Sometimes it is necessary to configure the SSC itself. The real card has two banks of dip switches for this,
which Virtual ][ presents in a more friendly way.
The DIP switches cannot be manipulated directly with the mouse, but they will move when you select
the corresponding option.


Most of these options can also be set by the Apple II software (such as a Terminal program), which is
more convenient than setting the DIP switches and restarting the virtual machine.
Note that some of the DIP switches cannot be changed at all; they must have a fixed setting in order for the
emulation to work properly. In particular, Virtual ][ does not support the old "Apple serial interface
modes" of the SSC.
Special considerations for serial TCP
Using a TCP socket lets you connect the virtual machine to basically any process on the network or on
your own Mac. This could be, for example, a modem emulator, such as
tcpser.
Some points of attention for configuring the super serial card with a TCP port:
- Use the SSC in communications mode, not printer mode.
- Baud rate is less critical than in a real serial connection, but still affects the data transfer speed.
The Apple II software must be able to keep track of all received data, so a too high baud rate
could cause input characters to be lost, or could result in an error.
- The number of data bits is taken into account; high-order bits are stripped as necessary.
- Stop bits and parity are ignored.
- The "asynchronous send" option is always on - it cannot be switched off.
- If the other end of the connection expects pure ASCII text, set SSC data bits to 7 and activate
"Send auto LF after CR".
TCP socket demo
This example demonstrates the serial TCP connection by connecting the virtual machine to the macOS Terminal
application.
No additional software has to be installed for this demo; the Terminal app is part of macOS, and on the
Apple II we use the built-in ROM.
First start the macOS Terminal and execute the command
nc -c -l 1234
This launches a process that listens to TCP port 1234. You can choose a different port number if you like, but
avoid ports reserved for the system.
Now configure a Virtual ][ machine with the super serial card in slot 2. Configure the
card to use 7 data bits, and to send a line feed (LF) after each carriage return (CR).
Choose the TCP option from the popup menu, and type the port number you specified in the nc command (1234
in this example). Leave the host field empty (meaning "localhost").
After closing the configuration sheet with the "OK" button, an RS-232 panel appears in the devices area. Click
the little button, and select "Connect" from the pop-up menu. If the connection is successful, the DSR and
CTS lines light up, to indicate a connection with an external device.
In the same pop-up menu, select "Force Data Carrier Detect", to make the Apple II think it is
connected to a modem.
Now at the Applesoft prompt in the virtual machine give the command
PR#2:IN#2
The DTR and RTS lines light up, indicating that the Super Serial Card has been activated.
The Apple II will send screen output to the SSC (and thereby to the Terminal window).
Similarly, it reads keyboard input from the SSC (and thus also from the Terminal window).
To test it, type anything on the virtual machine. Each character will immediately appear in the Terminal
window. Text typed in the Terminal window appears on the Apple II after pressing the return key.
Printed output of an Applesoft Basic program appears in the Terminal window. This can be
demonstrated with a simple Basic program, such as:
10  FOR I = 1 TO 10

20  PRINT I,I * I

30  NEXT
Configuring the serial connection for Unix named pipes
If you are familiar with Unix pipes you can connect the super serial card to other applications running
on the same Mac, using named pipes. These are eseentially just files: one process writes to a file while
the other process monitors the file and reads data as it arrives.
For bidirectional communication, two files are needed. Virtual ][ creates these files when
you have selected the "Named pipes" option. They have fixed names, "IN" and "OUT" (as seen
from the standpoint of the virtual machine), and are located in the directory
/tmp/VII-machine-name-slotn. So for example, for a machine in an Untitled window,
with the super serial card in slot 2, the two named pipes are /
tmp/VII-Untitled-slot2/IN and /tmp/VII-Untitled-slot2/OUT. The directory path is shown in the configuration panel.
When Virtual ][ creates these pipes it first removes any older versions of the
same files.
See below for an example of how to use the pipes.
Some points of attention for configuring the super serial card with named pipes:
- Use the SSC in communications mode, not printer mode.
- Baud rate and data bits are taken into account - Virtual ][ will slow down the data
transfer and strip high-order bits as necessary.
- Stop bits and parity are ignored.
- The "asynchronous send" option is always on - it cannot be switched off.
- If the other end of the output pipe expects text, set SSC data bits to 7 and activate
"Send auto LF after CR".
Unix named pipes demo
This example demonstrates the serial pipes by connecting to the macOS Terminal application.
No additional software has to be installed for this demo; the Terminal app is part of macOS, and on the
Apple II we use the built-in ROM.
First configure a Virtual ][ machine with the super serial card in
slot 2. Configure the card to use 7 data bits, and to send a line feed (LF) after each carriage return (CR).
Select the Unix named pipes option, and make sure the "force DCD" is on, in order to
to fool the Apple II into thinking it is connected to a real modem.
Start the macOS Terminal application, and open two windows. In one window execute the command
cat /tmp/VII-Untitled-slot2/OUT
In the other window execute the command
cat $stdin > /tmp/VII-Untitled-slot2/IN
In the RS-232 monitor of the peripherals section you will now see the DSR and CTS lines become available,
indicating that both pipes are open.
Finally, at the Applesoft prompt in the virtual machine give the command
PR#2:IN#2
This makes the Apple II send screen output to the SSC (and thereby to the output
Terminal window).
Similarly, it reads keyboard input from the SSC (and thus from the input Terminal window).
In the peripherals section the lines DTR and RTS light up, indicating that the super serial
card has been activated and ready to go.
To test it, type anything on the virtual machine. Every character will also appear in the Terminal output
window. Then type something in the Terminal input window and hit the return key. The line appears on de screen of
the virtual machine (and hence in the Terminal output window as well). The Terminal sends one line at at time,
not the individual characters as you type.
Unfortunately the return key in the input Terminal window is ignored by the Apple II
because the terminal sends a linefeed character, whereas the Apple II expects a carriage return
character.
Using the cassette recorder
NOTE: the cassette interface is not available on the Apple //c virtual machines.
General description
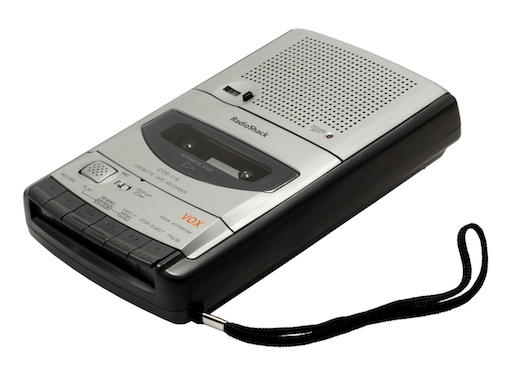
Before disk drives were available for the Apple ][, saving programs and data had to be done
on cassette tape. Virtual ][ emulates this feature mainly for nostalgic reasons; using
the emulated disk drives is much easier.
The "cassette tapes" are audio files in AIFF or WAV format. If you are curious how they sound, you can
play such a file in macOS, but be aware that the sound is loud and ugy; it is recommended to turn down
the volume a bit.
Reading from a cassette tape
To "play" a cassette tape, it is sufficient to "insert" the cassette tape
file in the cassette recorder. This can be done
in a similar way as inserting a disk in a disk drive: either click
the appropriate media button and select a file, or drag the file from
the Finder to the cassette recorder icon in the peripherals section. The
cassete recorder icon will show a "Play" symbol, but in fact the
tape does not start until the Apple ][ software reads the first sound sample.
Common ways to read the cassette tape are a "LOAD" command if the tape contains a Basic program,
or the "R" command in the system monitor to read binary data.

You can try this using the "Welcome tape" distributed with the application.
It contains a simple Applesoft program. Make sure you see the Applesoft prompt
("]"). Insert the tape file, then type "LOAD" and press return.
Reading the tape takes about 30 seconds. When the prompt shows up again you can issue
the "RUN" command.
To eject the cassette tape click the cassette recorder icon.
Writing to a cassette tape
To make a recording, create a new tape by clicking the "New cassette tape" icon
in the peripherals section, or use the menu entry in the "Media" menu.
Recording starts right away, so the tape contains silence until the Apple ][ software
starts producing output. Note however that after the last sound sample has been written no
more silence is recorded, so there is no rush to remove the tape after recording has finished;
the file won't grow more than necessary.
Common ways to write the cassette tape are a "SAVE" command to store a Basic program,
or using the "W" command in the system monitor to write binary data.

Troubleshooting
When reading a cassette tape, you might end up with "ERR" displayed on the screen.
If this happens, the emulated software did detect a signal (which is good), but was
not able to read the data. In this case, you can try a few different settings
for the playback volume slider. You'll find it in the "Cassette interface" section of
the machine setup. A lower playback volume helps suppressing unwanted noise in the audio.
Be aware however that there is no guarantee that all cassette files can be read successfully. This
is not different from the real Apple ][; loading a cassette tape was often tricky and
not always successful, especially if the tape was a bad copy or created with a different cassette recorder.
Format of the cassette tape file
Virtual ][ writes AIFF files, and can read AIFF and WAV.
These are some of the technical requirements and limitations:
- If the signal is stereo, the left channel is read. When writing a tape,
Virtual ][ writes one mono channel.
- The sample size can be 8 or 16 bits. When writing a
cassette tape, the emulator outputs 8 bits per sample.
- Sample rates up to 64000 Hz are supported. High rates give
more reliable results than low rates, but result in a larger files. When
writing a cassette tape, the emulator uses a sample rate of 16000 Hz.
- Cassette tape files are always read from the beginning; there is no way
to "fast forward". If you have a cassette tape containing multiple programs,
an app like Audacity
can help you extract the part you want.
Using an 80-column card with the Apple ][ and
Apple ][+
NOTE: this chapter is only applicable to the
Apple ][(+). For the Apple //e and //c, see "Using
80-column display on the Apple //e and //c ".
The original Apple ][ and Apple ][+ came with a built-in character
generator, able to display 24 lines of 40 characters each, uppercase only.
As this was quite limited, multiple 3rd party interface cards existed to display an 80 characters
wide screen, with both upper and lower case.
Virtual ][ emulates one of these, the "Term80" card, which can only be inserted in slot 3.
This card has its own video generator. Both the Apple II built-in video and
the Term80 video had to be connected to a "soft switch" device, which directed one of the two
video signals to the display monitor.
This whole configuration is available in the setup panel of the virtual machine. It is
recommended however to leave the soft switch with its default settings. When the Term80 card
is activated, using the Basic command PR#3, it automatically sets the soft switch to forward
its video to the monitor.
Note that this does not work the other way around: when going back to the built-in character generator
(the PR#0 command), the Term80 video output remains on the screen. To switch back, select
"Show Built-in Video" from the Quick Settings menu.
Term80 card special characters
All characters, both upper and lower case, can be entered in the normal way,
except two: when you enter "^", the Term80 card translates it to
"N". Likewise, it translates "@" to "P". This is a result of the
original Apple ][ keyboard layout. These two characters
must be entered with the "ctrl" key pressed.
Also, the Term80 card has a few interesting special key
combinations. The below table summarizes all special key
combinations.
|
ctrl-shift-^
|
Enter the character "^"
|
|
ctrl-shift-@
|
Enter the character "@"
|
|
ctrl-shift-E
|
Inverse mode
|
|
ctrl-shift-C
|
Normal (non-inverse) mode
|
|
ctrl-shift-D
|
Make hardcopy of the screen on the emulated printer.
|
|
ctrl-shift-A
|
Toggles the soft caps lock of the card. This is
basically the same as the soft caps lock of the emulated
keyboard (command-shift-A). You can use either option to
enter lower case characters.
|
Some technical details
The soft switch can be controlled programmatically by writing to memory addresses
$C058 and $C059. For example in Basic: POKE -16296,0 selects the primary video; POKE -16295,0
selects the secondary video.
The Term80 card supports the full ASCII character set (upercase
and lowercase). Because the original Apple ][ and Apple ][+
keyboards could only enter uppercase letters, a "shift key
modification" had to be applied, which involved connecting pin 2 of the keyboard
encoder board to push button 2 (pin 4) of the game I/O connector.
This modification allowed the firmware on the Term80 card to
detect whether the shift key was pressed in combination with any of
the other keys.
In the virtual machine setup you can enable or disable the shift key modification,
but it is recommended to leave it in its default (enabled) setting.
Using 80-columns display on the Apple //e and //c
The Apple //c machines have built-in built-in 80-column text support.
The Apple //e supports it if a memory card has been inserted in the auxiliary slot.
By default, such a card is present in a newly
configured virtual Apple //e.
Using the Apple Mouse
The Apple //c machines have built-in mouse support; the other
emulated machines need the emulated mouse card to be inserted in one of the slots,
preferably slot 4. This allows you to run programs such as
MousePaint or GEOS.
Apple II software that uses the mouse first switches it
"on". When this happens, the Mac
mouse pointer is hidden, and replaced by whatever mouse pointer the
Apple II software provides.
The mouse emulation smoothly integrates
with the Mac mouse: when the mouse pointer enters the window,
it instantly turns into the Apple II mouse, and the
Mac mouse pointer is hidden. The reverse happens when the
mouse moves out of the window: in that case it becomes a Mac
mouse pointer again.
Relative mouse mode
Unfortunately, smooth integration with the Mac mouse is not possible for
all Apple II programs. It works fine with MousePaint for example, but it
cannot work with GEOS. To solve this problem, the mouse emulation supports a special
mode of operation: "relative mouse mode".
You'll find it in the "Quick settings" menu. When this mode is switched on,
programs like GEOS work well, at the expense of Mac mouse integration.
Once the mouse has entered the window, it will be captured
there, and you must hold down the command key to let it escape.
Using the real time clock
The Apple II was not equipped with a built-in real time clock.
Several extensions existed to provide a clock, and Virtual ][
emulates three of these.
- The Mountain Computer AppleClock card can be used with DOS in the Apple ][
and Apple ][+ computers. It cannot be used with ProDOS.
- The Thunderclock Plus card can be used on all machines except the Apple //c. After its introduction in 1980
it became the de facto standard for the Apple II computers, and it is well integrated in ProDOS.
It is recommended to insert this card when you run ProDOS, because the operating system
then automatically uses it to time stamp your files.
- The "no-slot clock" is a clock chip that fits underneath a ROM chip in the Apple //e and
Apple //c.
It was a popular option, because it provides a real time clock without occupying a slot.
To use it, a software driver must be installed on the ProDOS boot disk.
The emulated clocks take the current time and date from the Mac clock. Only the
Thunderclock emulation allows adjusting the date and time; the others do not. However, when you
reboot the virtual machine, or create a new one, the Thunderclock will always be reset to the
macOS system clock. Changing the Thunderclock time does not affect the Mac clock.
Using the Z80 card and CP/M
NOTE: Z80 support is not available on the Apple //c machines.

A popular enhancement for the
Apple ][ (and //e) computers was the Z80 card. This card
contains a Zilog Z80 or Z80A processor, plus hardware to transfer the
flow of control from the main 6502 processor to the Z80 and vice
versa (only one of the processors can be active at any time). The Z80
card made it possible to run the CP/M operating system, and gave
access to popular applications like WordStar, DBase and SuperCalc. It
also allowed the use of programming languages like Turbo Pascal,
Fortran, and even COBOL.
The Z80 card in Virtual ][ emulates the Z80A processor.
You can configure the processor to run at a speed of either 2 MHz or
4 MHz.
To use the card you need a bootable Apple II CP/M disk
image. The boot software on this disk searches for the presence of a
Z80 card. When it detects one, it switches to the Z80A processor.
After booting is complete, the CP/M prompt is presented.
Using the joystick / game paddles


The Apple II came with
two game paddles. Each paddle provided an "analog" input by turning a
knob, and a "one-bit" input by pushing a button. Replacing the two paddles with a single joystick
was a popular enhancement.
The Game I/O connector of the Apple II allows for
connecting up to 4 analog inputs and 3 one-bit inputs. Virtual ][
emulates all of these connections. The best way to play the old games is using a
USB or Bluetooth game controller. Alternatively, you can control the game input with
the keyboard and mouse.
Virtual ][ will automatically use the game controller if it detects one.
Mapping the gamepad elements to the Virtual ][ game inputs
If Virtual ][ detects a USB or Bluetooth game pad, it automatically maps the available controls to
the emulated Apple II game inputs. You can inspect these mappings by selecting "Configure Game
Controller" from the "Virtual ][" menu (or by clicking the game pad button in the toolbar).
If you are running macOS 11 (Big Sur) or higher you can use the Gamecontrollers section of the System Settings
to assign different buttons and joysticks. You could, for example, switch the left and right joysticks.
If you run macOS older than Big Sur, or use a game controller that cannot be configured at the system level, Virtual ][
presents you with a built-in configuration panel.
Example of game controller profile (macOS 11 and up)


Example of built-in game controller configuration
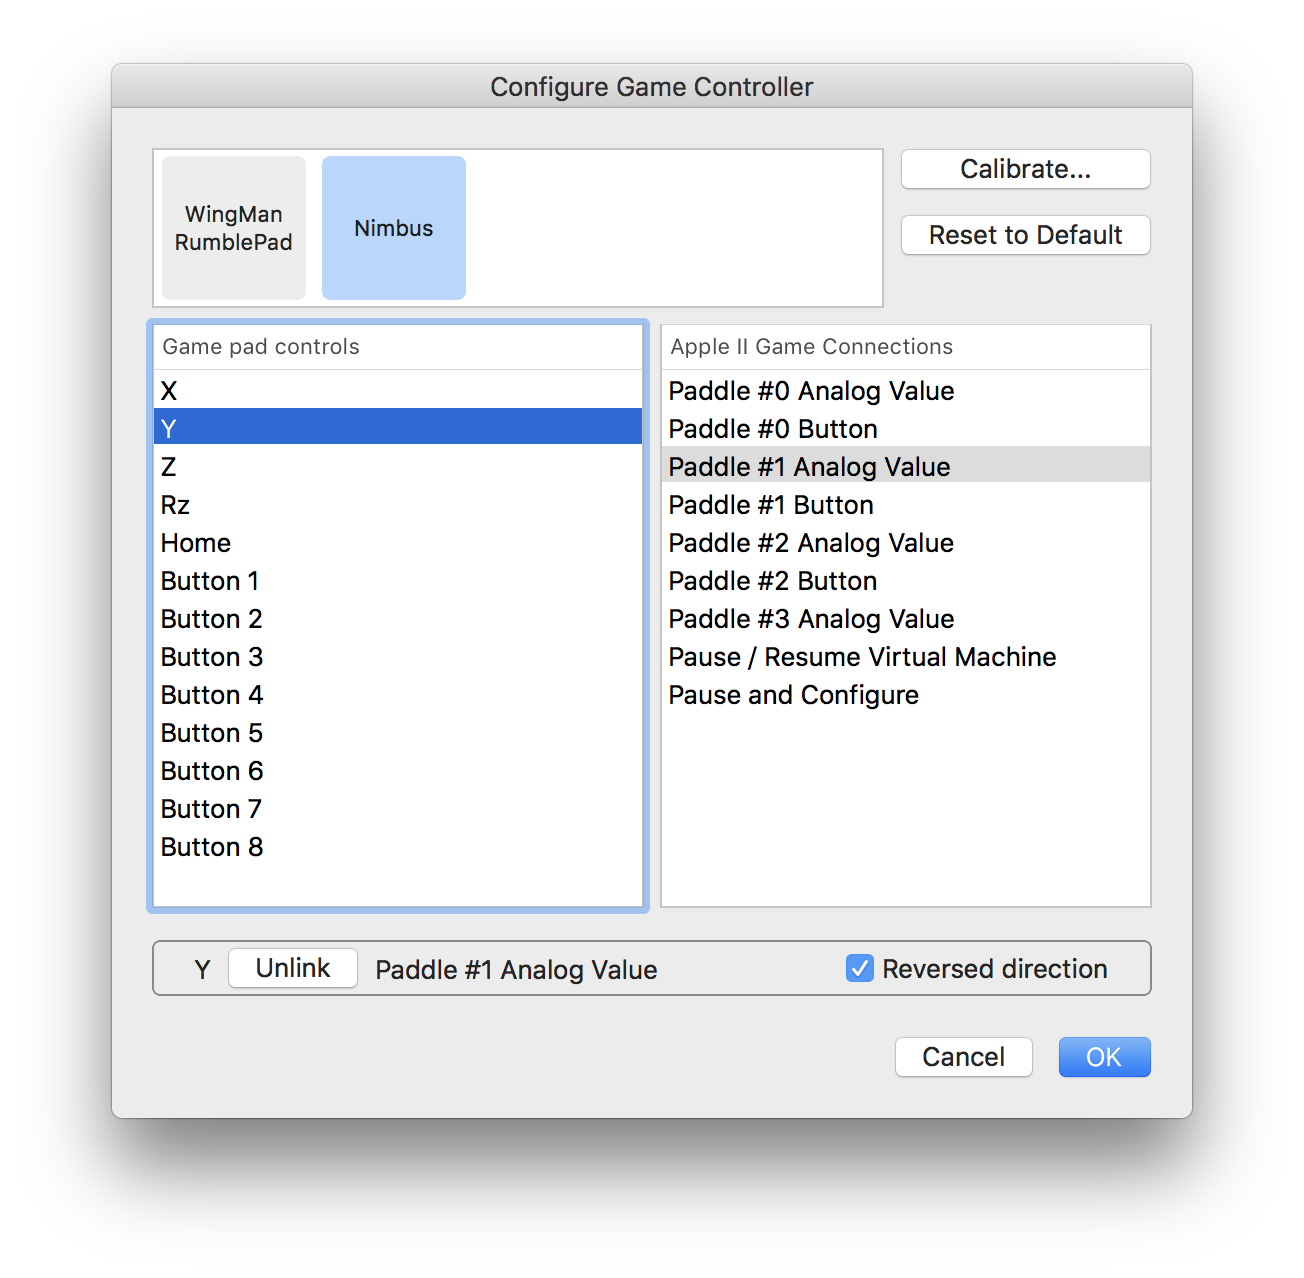
Testing the game controller
Here is a little Applesoft Basic application to check if your game pad or joystick works correctly. It continuously
displays lines with the four game paddle analog values. Move the joysticks on your gamepad to see the values
change. They should run from 0 to 255, and have 127 as their neutral value.
To run it, start a standard Apple //e or //c. You don't have to boot from a diskette; just click "Reset" to
go to the Applesoft Basic prompt. Now copy the next few lines and paste them in Virtual ][
10  PRINT  PDL (0); TAB( 10); PDL (1); TAB( 20); PDL (2); TAB( 30); PDL (3)


20  GOTO 10


RUN
Another little Basic program lets you test paddles #0 and #1, which are used for most games.
It shows the analog values as well as each paddle's push button.
10  PRINT  PDL (0); TAB( 10); PEEK ( - 16287); TAB( 20); PDL (1); TAB( 30); PEEK ( - 16286)


20  GOTO 10


RUN
Emulating the game paddles with keyboard and mouse
Virtual ][ lets you control the game paddle inputs with the Mac keyboard and mouse, albeit in a limited way.
To this purpose, select "Use Arrows as Joystick" from the "Quick settings" menu.
This may work fine for some games, but be aware that it does not give you the same amount of
control a real joystick does. A joystick produces values from 0 to 255. With the keyboard arrows, the
possible values are limited to only three: 0, 127, and 255.
Also be aware that many Apple II games have a built-in option for keyboard play. This usually
gives a better user experience than emulating the joystick with the Mac keyboard!
You can operate the paddles' push buttons with the command and option keys. If you want to
use the command key for this purpose, it is recommended to disable the Virtual ][
command key shortcuts using the "Quick settings" menu.
You'll find additional configuration options in the "Game connector" configuration panel of the
machine configuration (not available on the Apple //c machines).
Working with sound
Overview
Sounds played an important role in the Apple II computer. First
of all, it had an internal speaker, controlled by the software. It could do more
than just produce simple "beep" sounds; many games used it to produce
music and sound effects. Secondly, there were the sounds produced by the hardware.
Everyone who used an Apple II knows the "clackety-clack"
sound of the disk drive when you booted the operating system.
Finally, if the machine supported peripheral cards, you could
increase the sound capabilities of the machine with third party hardware; the most
popular was the Mockingboard card.
Virtual ][ supports all these options, and allows you to control their
behavior.
Mockingboard
NOTE: the Mockingboard is not available on the Apple //c virtual machines – these machines have no slots.
The Mockingboard card was able to produce much higher quality sounds than the internal
speaker. It came in different flavors; the one supported by Virtual ][
emulates two sound chips that together can produce 6 simultaneous sounds. The
Mockingboard card is used in some popular games, such as Ultima V. When the
Apple II asks you to identify the card, specify type "A", or
"Sound II".
Recording a movie
Virtual ][ lets you easily record a QuickTime movie of
everything that happens on the emulated Apple II screen.
Just select "Make Movie of Apple II Screen" from the File menu. The application
will present a standard File Save panel to let you select where the movie
must be saved. After that, recording starts, and will continue until you
select "Stop Movie Recording" from the File menu. After recording has stopped,
the movie will automatically be opened in the QuickTime movie player.
If you pause the virtual machine, movie recording also pauses. It
continues when you resume the virtual machine.
During recording, the movie is written to a temporary file on your disk. When you
stop recording, the temporary file is moved to the location you selected. This might
take a few seconds.
Virtual ][ records at 20 frames per second. The movies typically take
3 to 6 MB of disk space per minute. The feature does not record sound.
Note that the movie recording option is only available in the full license version of the application.
Working with character sets and international keyboards
About character sets
The computer's "character set" is the collection of all characters that can be displayed on
the text screen.
In the USA the Apple II computer came with the
standard ASCII characters, but
international models usually had an alternative character set, with characters
for specific languages. For example, the French Apple II supported characters such as
à, é, and ç. These characters replaced @, {, and \ respectively, because the
character coding space was limited.
Some international Apple II machines came with a switch that allowed the user to
instantly switch between character sets. A similar feature is available in
Virtual ][. The "Quick settings" pull-down menu contains a list of available
character sets.

By selecting a character set, the screen is immediately updated. This example shows how the Apple //e
welcome line is shown in the Latin and the Greek character sets.


About international keyboards
On the Apple II, international characters were supported on the screen as well as on the keyboard.
To that purpose the machines were equipped with a special character generator rom that defined
both the international and the standard ASCII characters.
For example, the French keyboard has a key labeled é. This key results in an é on the screen,
provided the French character set is selected.
Selecting a character set in Virtual ][ not only updates the screen, but also maps the special
characters on your Mac keyboard to the
equivalent Apple II character code. So for example, if you have a French Mac, and you set
Virtual ][ to the French character set, pressing the key labeled é
will produce an é on the screen, like on the real machine. However, if you select the "Latin" character set (the
standard ASCII characters), pressing the same key will not produce any character on the screen at all.
Because the keyboard behavior obviously depends on the currently selected character set, you'll see
a little flag symbol at the top left of the window to remind you what the current setting is.

Character sets in Virtual ][
The application comes with a number of predefined character sets, as shown above.
The character sets "Latin" and "Latin Uppercase Only" are the ones representing the
standard ASCII characters. The "uppercase only" variant was used in the Apple ][
and the Apple ][+, because these machines lacked lowercase character support.
The "Latin" set was standard in the Apple //e, and contains the standard ASCII characters
plus a number of special characters (the so called "mouse characters", used to draw user interface
elements such as window borders).
Note that the Bulgarian character set is based on the Pravetz-82 (Правец-82), a popular
Apple ][ clone. The character set works best when you install the Pravetz-82 system ROM.
Defining your own character sets
In the Apple II computer the characters were defined in a character generator ROM, which
could be replaced by a customized ROM. Virtual ][ offers the same feature. In order
to do this, you must provide the application with the following:
- A bitmap file with the character definitions. The format of this file is described below.
- Optionally, a bitmap with a picture of the "flag" symbol to be shown at the top left of
the main window when your character set has been selected. If you omit this, no symbol will be shown.
- Optionally, a translation table to map Mac keyboard characters to your character set. If you omit
this, no keyboard mapping will take place.
The character definition bitmap should be placed in the directory ~/Library/Application Support/Virtual
][/CharacterSets. The file contains pictures of all symbols in the character set, and
must be structured as follows:
- The file must contain a bitmap saved as PNG or TIFF.
- The width of the bitmap must be exactly 128 pixels.
- The height of the bitmap must be at least 64 pixels.
- The bitmap depth must be 1 or 8.
- Each character of the set is defined in a cell of 8 x 8
pixels. This implies that the entire character definition bitmap
contains 8 rows of 16 characters each. Note that the rightmost
pixel column of each character cell is ignored, because characters
on the Apple II computer are only 7 pixels wide.
- A black pixel represents the background; any other value represents "white",
and is part of the character.
- The first two character rows of the bitmap define the symbols of the
"alternate" character set on the Apple //e computer. Their
ASCII values range from 64 to 96, and these characters are shown
if the alternate character set has been activated by the Apple II
software. These symbols are ignored on the Apple ][ and the
Apple ][+.
- The 3rd to 8th rows of the bitmap define the characters with
ASCII values 32 to 127.
As an example, here is the definition file of the character set
"Latin", used in a standard Apple //e.

The second element of your own character set, the "flag" symbol representing the character set, can
be any picture format supported by macOS. It is recommended to use the png format.
For best results, make the picture at most 11 pixels high and at most 16 pixels wide.
The picture must be stored in the same directory as the character set definition file.
These files are tied together with the keyboard translation table in an
XML file with this path: ~/Library/Application Support/Virtual ][/CharacterSets/International.plist.
Such a file can best be created with a property list editor. The file can best be explained with an example.

This example contains two custom character defintions, named "My character set" and "Yet another character set".
These names will appear in the Character Set menu. If you choose a name already in use by a built-in set, your definition
replaces the built-in one. So if you want to add a new character set, be sure to choose a unique name.
Each character set entry is itself a dictionary with three elements: the file name of
the character set definition, the file name of the associated icon (the optional "flag" symbol), and the
keyboard translation table.
The keyboard translation table contains two columns: the first is the character typed on the Mac
keyboard; the second is the resulting ASCII code (in the range 0 - 127) that will be input in the virtual
machine. You can specify the second column value as either a number (the ASCII value) or as a string
(the corresponding character). The first column must be one single character, and it must not be in the standard
ASCII range. So for example, you cannot translate the character "a" to something else, nor can you translate a
control code or a function key. You can, however, translate non-ASCII characters, as shown in the example.
Configuration
Virtual ][ comes with a number of pre-configured machines.
You can change these, or set up a completely new machine from scratch, with the Configuration panel.
After configuring a specific machine, you can save the setup with "Save Configuration As..."
in the File menu. Alternatively, you can make it the default configuration with the Machine menu.
The Apple //c allows devices, such as disk drives, to be connected directly to the machine.
A mouse and a printer are automatically included.
The other machines have slots for peripheral interface cards, and allow more customization.
Therefore Virtual ][ has two different configuration panels, as shown here.
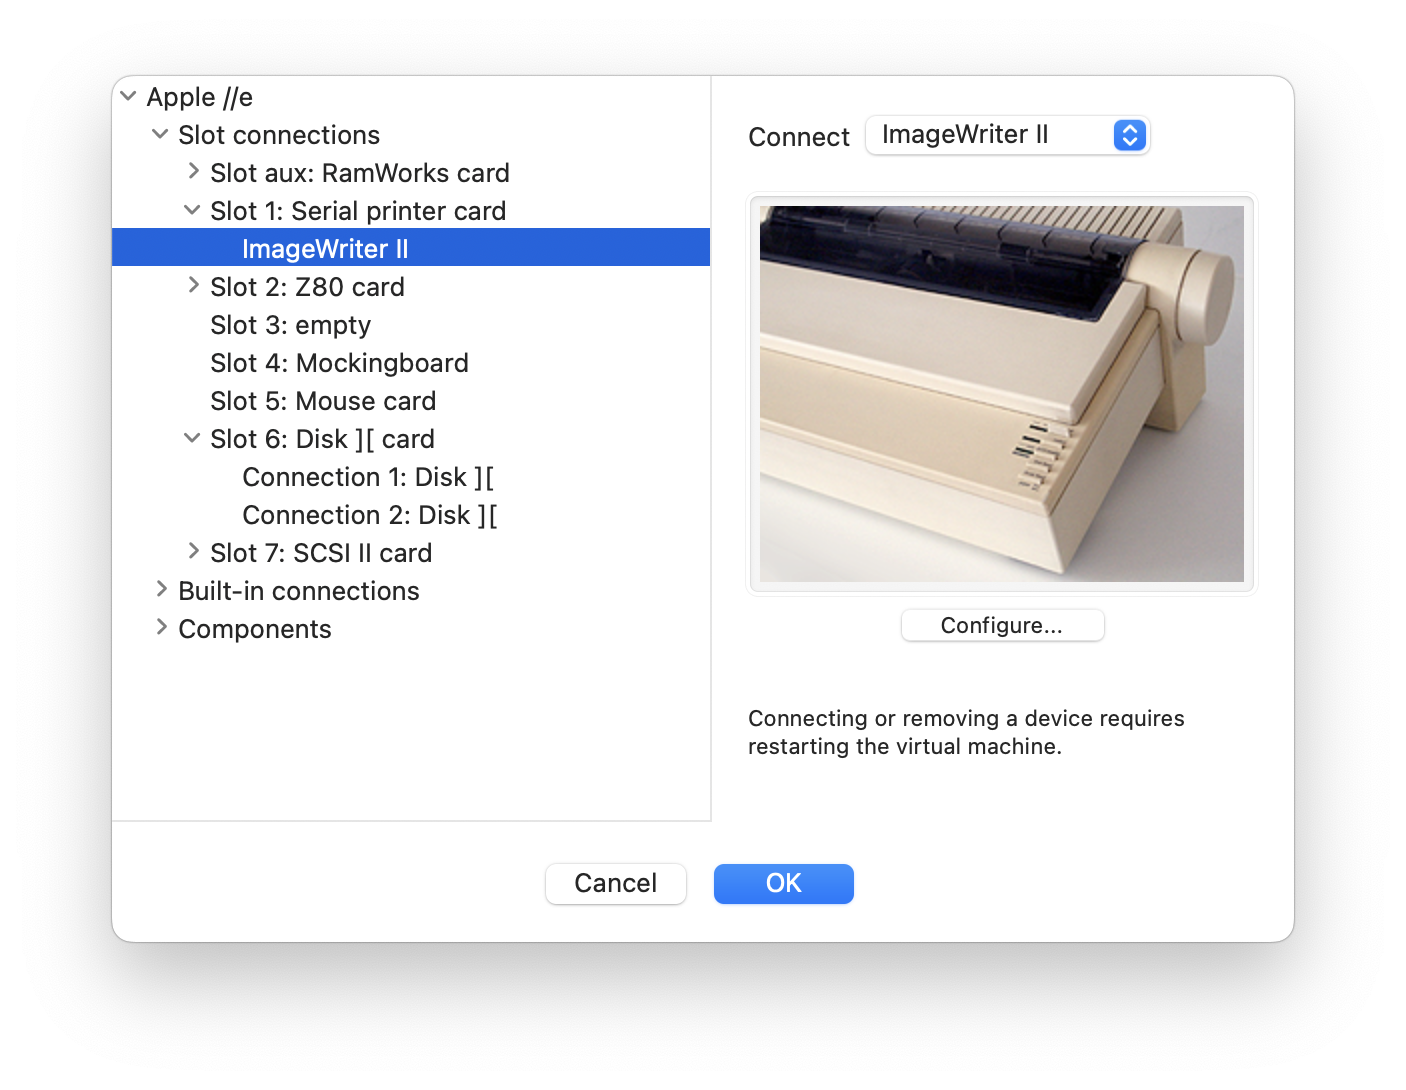

To change the configuration of a virtual
machine, choose "Configure..." from the Machine menu, or click the
"Setup" button in the toolbar. Note that some configuration changes require a restart of the
virtual machine.
Additional options can be found under "Quick settings" in the main menu bar. It provides an easy way to change
properties that do not require a restart of the virtual machine.
For expert users the Apple //c configuration has a hidden "advanced" section, which can be shown by
opening the panel while holding down the "option" key.
Controlling Virtual ][ with AppleScript
Overview
Virtual ][ supports Apple's powerful AppleScript technology, which allows
you to control the virtual machine using a script. The script can do such things as create and configure
virtual machines, type commands on the virtual keyboard, wait until the screen indicates an operation
has finished, save printed output, and even insert
disk images directly from internet. It allows you to let Virtual ][
perform an automated task, such as starting up your favorite Apple II game.
You can also use it to create some nice Apple II demo's.
The application comes with a number of example scripts, which you can find in the AppleScript
menu.
When you select one of the example scripts from the menu, you will get the choice
to either run the script or open it in the Script Editor. The scripts are hidden inside
the Virtual ][ application bundle, so if you want to make changes, it is
recommended to save them in a different location.
When you make your own scripts, you can add them to the AppleScript menu by copying them
to the Virtual ][ scripts folder. The easiest way to locate that folder is
to select "Open Scripts Folder" from the AppleScript menu.
A practical example
This example shows some of Applescript's possibilities.
Suppose you often play the game "Little brick out", which was distributed on the original DOS 3.3
master diskette. You always play it on an Apple ][+ with a color screen.
When you make a script that starts your favorite game in Virtual ][, you only have to double-click
that script to begin your game play.
In its most elementary form this is what such a script looks like.

The script assumes that the disk is called "3.3 master.dsk", and is in the folder you configured
as your "favorite disk folder" in the Virtual ][ preferences.
The script first moves Virtual ][ to the foreground (activate) and
gets rid of any currently running virtual machines. It then
creates an Apple ][+ and makes sure it has a color screen. After that, it inserts the
disk image into slot 6, drive 1. While the machine boots, the script types the DOS command to run
the game: "RUN LITTLE BRICK OUT". Virtual ][ sees to it that the typed characters are buffered
until the Apple ][+ is ready to process them (which is after booting is complete).
Although this script works OK, it can be improved by temporarily switching the
virtual machine to a higher speed during booting and loading the game. This dramatically reduces the
start-up time; from 25 seconds it takes on a real Apple ][, to just one or two seconds, depending
on the speed of your Mac.
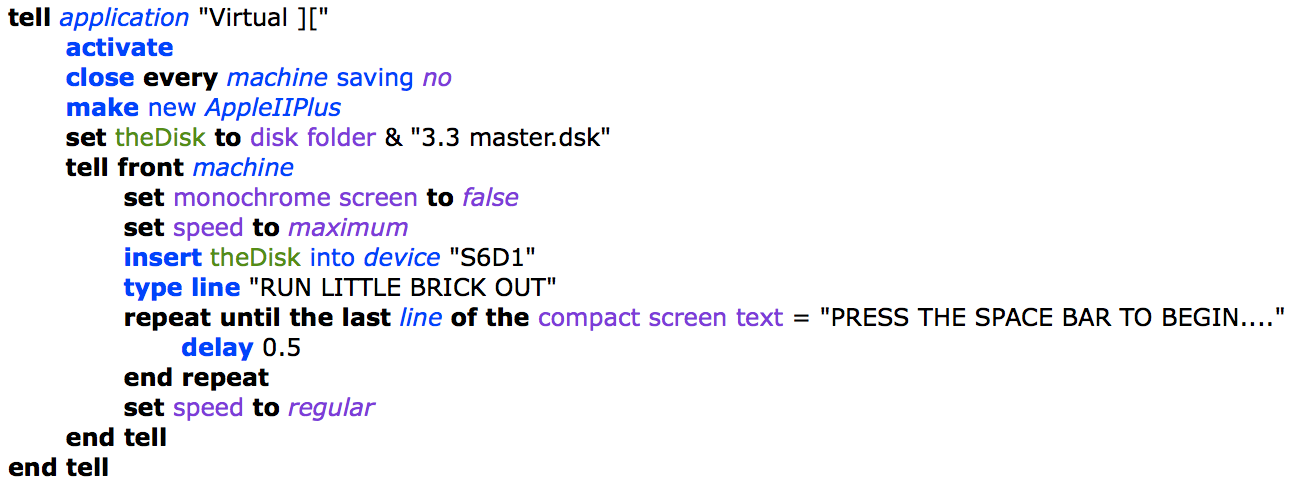
The trick is that the script sets the speed of the virtual machine to "maximum", and resets it to
"regular" after the game finished loading. The latter is important: you don't want to play the game
at top speed! The script must know when to reset the speed; it does this by looking at the screen
with intervals of 0.5 seconds. When the last line on the screen displays "PRESS THE SPACE BAR TO BEGIN....",
we know the game has been loaded and the speed can be reset.

Writing your own scripts
When you want to write a script, a good start is to study the example scripts.
Virtual ][ does not support recording a script in the Script Editor, so you'll
have to use the editor to type the statements yourself.
However, if you are familiar with the AppleScript language you'll find it easy to write scripts
for Virtual ][. The script dictionary is based on a simple object model.
At the top of the object hierarchy is the application object, as in any AppleScript
dictionary. The application contains one or more machines. When you make a new machine
object, you'll get a machine that is configured like the default configuration, just as when you
select "New Default Machine" from the File menu. Another way to create a machine object is
by making an instance of one of the classes AppleII, AppleIIPlus or AppleIIe.
The third way to make a machine is by opening a saved configuration file. You'll find examples of
these techniques in the demo scripts.
Referring to a specific machine occurs just like referring to a document in other AppleScript-aware
applications: by number or by name. When you have just one virtual machine running, the easiest way is
to just say front machine.
A machine object contains a number of devices. You cannot create these device objects with
AppleScript; they are automatically created when you create a machine. You refer to the devices by
name. For slot devices, the name is derived from the slot it is connected to. For example, a device
connected to a card in slot #1 is called "S1". A disk drive, typically connected to a disk card in slot #6, is
called either "S6D1" or "S6D2", depending on whether it uses connection 1 or 2 of the disk card. If you are familiar with
Applesoft Basic, these device names should look familiar. Devices that are not connected to a slot
have fixed names. For example, the cassette recorder device is simply called "cassette recorder".
To find out the device names currently in a machine, execute a script as shown in the
example below.
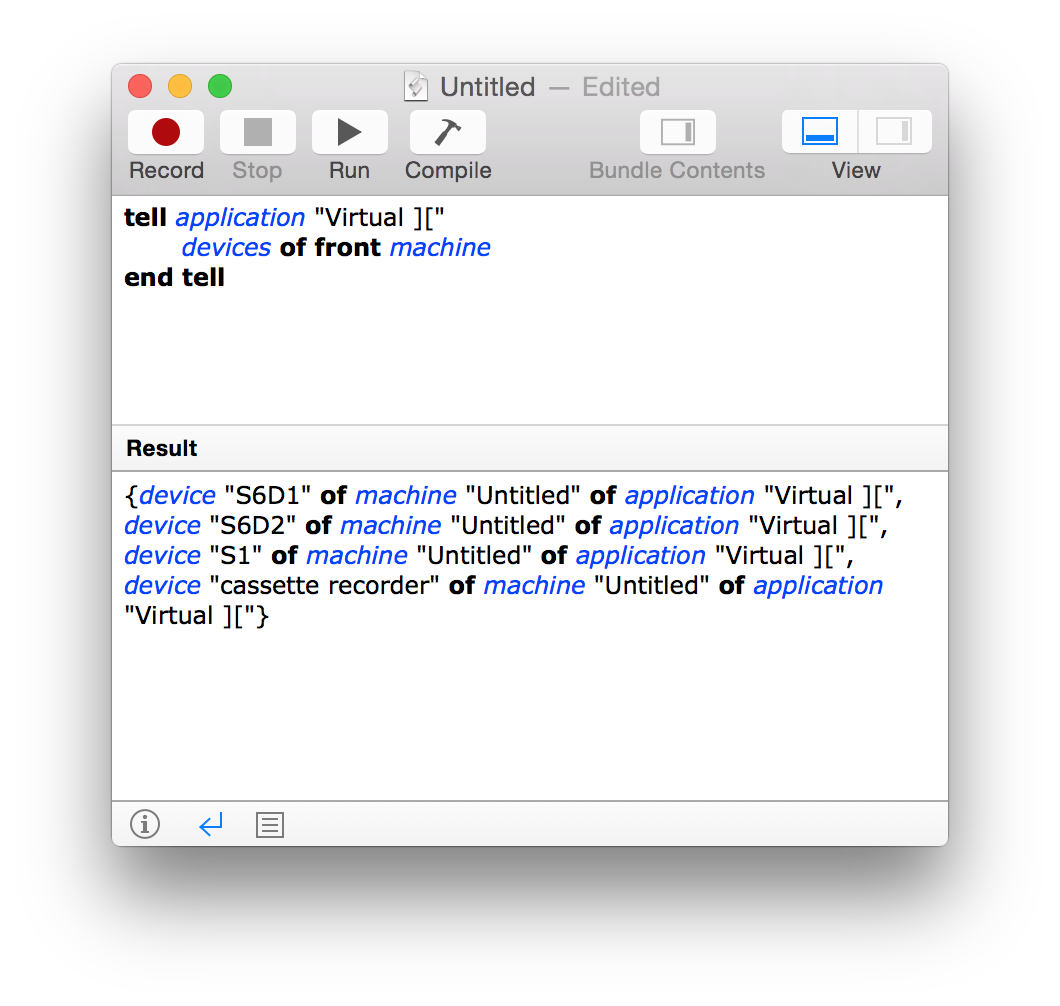
Each device has a property, devicetype, which indicates what it is: an Epson printer,
a hard disk, and so on. This example shows the device types of the same virtual machine as the
previous example.

You can find out what is on the machine's screen by using the property screen text or
screen picture. The screen text gives a collection of all the lines on the screen. You
can examine these text objects to see if the running process has produced screen output. Often it
is more convenient to use the alternative compact screen text; this one omits empty lines and
strips trailing space characters from the remaining lines. Study the example scripts to see how this
can be used.
The screen picture property can be used in the same picture command. This powerful
command compares (part of) the screen picture with a previously saved file. This allows you
to wait until a running process has rendered a specific picture on the graphics screen. Virtual ][
offers a convenient way to save the pictures to compare to: use "Export Screen Picture"
in the File menu.
Waiting for some screen output to appear is typically a combination of two things: testing the condition
and using the command delay. The latter is part of the standard AppleScript additions. It suspends script
execution for a specified time period, while the virtual machine keeps running. This allows
you to test the screen at regular intervals (every second or so). The example scripts demonstrate this technique.
Finally, the dictionary supports a way to enter any key on the Apple keyboard with the type
command. It has a number of variants, so apart from typing plain characters, you can also enter
control-key combinations, open and solid Apple keys, and other special keys like up and down arrows.
If the AppleScript type commands are executed faster than the Apple II can process them (which is very likely)
the keystrokes are buffered until the Apple II processes them. So eventually all keystrokes will
arrive in the virtual machine and none will get lost.
To find out the details of using AppleScript with Virtual ][, use the Script Editor
to open the application's dictionary and study the classes, commands and properties.
Getting support
Did you encounter technical problems in Virtual ][? Or perhaps you found an
Apple II program that doesn't run, or have suggestions for improvements? Tell me about it
by e-mail.
When reporting a problem, don't forget to mention what versions of macOS and Virtual ][ you use.
You might also want to check if a later
version of Virtual ][ is available on the
web site.
Release notes
Version 13.1.1, January 2026
- Solved an issue, introduced in version 13.1, that caused some Apple II programs to fail.
Version 13.1, January 2026
- The inspector window now offers a choice of two layouts, with different font sizes.
- Added a "find previous" button to the memory section of the Inspector.
- A Mac folder, mounted as a ProDOS disk, now supports sparse ProDOS files.
- A newly created initialized diskette now gets the correct file creation date.
- Fixed an issue that could crash Virtual ][ when the virtual machine directly accessed
the I/O addresses of the SCSI card (which should only be used with the SmartPort and ProDos block
interfaces).
- Fixed a glitch that could cause unexpected behavior in Applescript.
- The example Applescript "Mockingboard demo" failed on some machines; this has been fixed.
- Solved a few macOS 26 compatibility issues.
Version 13.0.1, June 2025
- Printing on the ImageWriter works again; it was accidentally broken in version 13.0.
Version 13.0, May 2025
- The Super Serial Card can now send and receive data through a TCP connection.
- The serial TCP connection is fully compatible with the "tcpser" virtual modem.
- Added the option to save a detailed serial communication log for troubleshooting.
- The application settings have a new option to keep the toolbar visible while working full screen.
The option is off by default.
- On an Apple ][ and Apple ][+ the Term80 card now automatically switches
to 80-column display when activated.
- The emulated cassette interface can now read WAV files.
- The reliability of the cassette tape input has been improved. If you use the tape emulation in a saved
configuration, it is recommended to update the configuration's cassette default setting.
- Fixed an issue that could cause the VBL (vertical blanking) status to be reported incorrectly
(Apple // only).
- Substantially improved emulated interrupt handling, to accommodate the high-frequency interrupts
needed for serial TCP input / output.
- Several other bug fixes and minor improvements.
Version 12.1.1, November 2024
- The program "MouseWord" failed to load; this has been fixed.
- Corrected a mistake that caused cassette tape files not being recognized anymore in version 12.1.
Version 12.1, November 2024
- Improved rendering of Apple II high resolution graphics. The colors as well as the color transitions
now better resemble the original machine's output on an NTSC TV.
Note that the previous high resolution rendering can still be selected in the application settings.
- Restored support for the iBuffalo Classic USB Gamepad.
- Added the property screen sharpening to the Applescript vocabulary, so a script can now also switch this
feature on or off.
- In macOS 15 (Seqoia) connecting an emulated Super Serial card caused the devices area to be drawn incorrectly. This has been solved.
- Fixed an issue, first appearing in version 12.0, where the button for selecting a custom ROM failed to work.
Version 12.0, October 2024
- Virtual ][ now requires macOS 12.0 (Monterey) or better. Virtual ][ 11.4 remains available for download to run on macOS 10.13 up to 11.0, but is no longer actively supported.
- Generating a movie of the Apple II screen did not work correctly in macOS 15 (Sequoia). This has been fixed.
- The built-in Quick Look viewers for disk images and saved machine state failed in macOS 15 (Sequoia). These modules have been rewritten to fully comply with macOS versions 12.0 and up.
- The app now offers a keyboard shortcut to make snapshots of the virtual machine's screen, and creates a
default file name that is based on the previous snapshot plus a sequence number.
- The cassette tape emulation now accepts input files with file extension .aiff or .aif (was .cass only).
- The print preview can now be closed with the esc key.
- Resetting the virtual machine while the Z80 processor is active could hang the application; this
did for example happen in CP/M 3.0. This issue has been solved.
- The app crashed when a cassette tape was ejected while being recorded. This has been fixed.
- Solved an issue where the performance monitor graph could appear outside its bounds.
- Corrected the way zero page access is affected when the Apple //e is reset. This improves general compatibility.
Version 11.4, June 2023
- Added emulation of the Applied Engineering RamFactor card. This card can be used as a RAM disk, and provides additional memory for compatible programs such as AppleWorks.
- Minor improvement in the "print to clipboard" feature: it now stops when the printed content is pasted anywhere.
Version 11.3.1, April 2023
- Solved an issue, introduced in the previous release, that could cause the emulated mouse to stop moving on the Apple //c.
Version 11.3, March 2023
- Improved support for game devices, such as the PS5 and Xbox controllers. This improvement is available on macOS 11 (Big Sur) or later.
- Solved an issue that could disable the emulated speaker sound after resetting a virtual machine.
- Fixed an error in Apple //c memory management, improving general compatibility.
- The option to use the Mac backspace key as the virtual machine's "left-arrow" is now part of the Quick settings menu, and thereby available for the Apple //c.
- It is now possible to select a custom ROM image for the Apple //c. Note this is an advanced feature, intended for testing and debugging ROM code.
Version 11.2, January 2023
- Created a configuration panel for the Apple //c machines.
- The Apple //c now supports the no-slot clock.
- The standard configuration of the Apple //c with 32KB ROM now has two diskette drives and one
OmniDisk drive. A second OmniDisk drive can be configured.
- On a virtual machine with just one floppy disk drive, a crash could occur when the disk
stopped spinning. This has been fixed.
- Corrected an error in handling the Language Card switches (memory addresses $D000-$FFFF). This improves general compatibility.
- The previous release used the term "Apple //c Plus" for an Apple //c with a 32KB version 0 ROM.
This misnomer has been corrected throughout the application, including the Applescript dictionary.
- Improved the "simple text printer". It used to generate a unique file name on the Desktop; now you
have the additional option to specify your own file path.
- Under rare circumstances the Inspector could affect the operation of the virtual machine, even if no
breakpoints had been set. This has been solved.
- Clarified some error messages.
- Several minor performance improvements.
Version 11.1, September 2022
- Added emulation of the Apple //c with 32KB ROM.
- Clarified the Apple //c (Plus) setup screen.
Version 11.0, July 2022
- Added emulation of the Apple //c.
- Simplified the installation by including, in the Help description, download links for the proper ROM files.
- When creating a blank diskette image, you now have the option to initialize it right away as a DOS 3.3 diskette.
This can be convenient if, for example, a game asks for a newly formatted disk.
- Movie recording can now be stopped with a keyboard shortcut.
- The Super Serial Card's RS232 interface was always shown in the devices area. It is now hidden, unless the card
is linked to a serial Mac device or Unix pipe.
- Sometimes the emulated mouse would jump to an unexpected location until the main window was moved. This has been fixed.
- Corrected several minor issues.
Version 10.6.5, February 2022
- From now on the limited license includes full matrix printer emulation. Previously this required the full license.
- If an error occurred when sending bytes on a serial connection, a generic error message was shown, with insufficient
information. This has been solved.
- Corrected the timing of instructions that are unsupported by the 65C02 processor.
This should (slightly) improve general compatibility.
Version 10.6, January 2022
- Improved the unshrink feature. The extracted files are assigned any metadata stored in the archive: ProDOS file
type, aux type, file creation date, as well as file modification date.
- Partial support for disk images with 13 sectors per track (file extension .d13). These disk images
can be mounted, but any changes are lost when the disk is ejected.
- Fixed a potential crash when working with gzipped disk images.
Version 10.5.1, November 2021
- Creating a movie of the Apple II screen failed on a Mac with Apple silicon. This issue has been solved.
Version 10.5, November 2021
- The application can now unpack ShrinkIt archives.
- Files inside ShrinkIt archives are automatically indexed for searching in Spotlight, and
are shown by the Finder in a QuickLook preview.
Version 10.4.1, October 2021
- Dark mode was disabled in the previous release; it now works again as before.
Version 10.4, August 2021
- Improved the appearance and behavior of the main window toolbar.
- Created an option to save screen snapshots with an 8-pixel black border.
- Previously, some keys repeated when held down and some didn't. This has been solved: all keys now repeat.
- Fixed a number of bugs and memory leaks.
Version 10.3.1, July 2021
- Added a pull down menu to save an Apple II screen as a PNG file. Previously, this function was only available through Applescript.
- If the "shift key modification" has been configured, the initial value of game controller button #2 was incorrect. This has been fixed.
- Improved CPU usage in top-speed mode, which should reduce the occasional "spinning beach ball" cursor.
- Several improvements "under the hood" to stay compatible with future macOS releases.
Version 10.3, April 2021
- Fixed several crashes that could occur if a Disk ][ interface card has no connected drives.
- Corrected an error in checking the version number in the WOZ INFO chunk, enhancing compatibility with
WOZ disk images available in the public domain.
- Extended the feature to speak lines on the screen; the application can now automatically speak new text lines as
they appear.
- Fixed a bug where the "speak new screen lines" menu could result in speaking the entire screen instead.
- The application did not recognize some usb-to-serial adapters. This has been solved, both for the serial card emulation in
Virtual ][ and for transmitting disk images with A2V2.
- Fixed an issue that could cause the number of data bits in a serial connection to be affected by the parity setting.
- In the configuration of the Thunderclock card, if the option "Allow setting the time" is switched off, the card's
internal time is now (re)set to the Mac system time.
- The shortcut for triggering a non-maskable interrupt (ctrl-command-F11) now also works if the "Command key is Open
Apple" mode is active.
- Clarified the Applescript description of the "insert" command to point out that this command cannnot mount a
Mac folder in a Disk ][ drive.
Version 10.2.2, February 2021
- With some Mac configurations the screen updates showed intermittent delays due to a core image filter ("sharpen").
To mitigate this, the filter has now been made optional. It can be disabled in the View section of the application preferencespreferences.
- The "insert a disk image" sheet worked poorly with files and folders on the iCloud drive. This has been improved.
- Fixed a number of crashes that sometimes occurred when closing a virtual machine window.
Version 10.2.1, January 2021
- Fixed an issue that could cause game paddle input values to make large jumps, skipping intermediate values.
Version 10.2, January 2021
- Inspector watchpoints can now be defined for a specific memory bank, improving their use for debugging.
- Added keyboard shortcuts for the main Inspector functions break, resume and single step.
- It is now possible to see the full path of a mounted disk, instead of just the disk name. Select this option in the Advanced section of the Preferences.
- Added a menu entry and an Applescript command to trigger an NMI (non-maskable interrupt).
- In the "Media" menu added an entry to flush every loaded diskette to its corresponding disk image file.
- An uninitialized .woz diskette is now saved as a disk image with zero tracks. In previous versions it used to be discarded.
- Double-clicking a .po hard disk image in the Finder resulted in an error message. This has been fixed — the disk is now
mounted if a drive is available.
- Corrected an issue that could inadvertently silence the disk drive sound effects.
- The appliation saved some Woz disk images with an incorrect format. As a result, the application crashed when mounting
these images again or when opening a virtual machine snapshot containing these disk images.
Some technical background: this occurred with disk images containing a WRIT or COMP chunk, which Virtual ][ doesn't use and
should have ignored. The issue has been solved, but unfortunately the bug has effectively removed these chunks from
affected disk images.
- In macOS Catalina and Big Sur the Finder mistakenly showed disk image thumbnails with a dog-ear. This has been solved.
- Fixed a bug that could crash the application when a machine was closed while sound effects were being heard.
- Fixed a potential crash when entering an invalid license code.
- Fixed some minor layout issues.
Version 10.1, November 2020
- The application has native support for Intel and Apple Silicon.
- Clicking an empty disk drive now shows a popup menu to insert or search for disk images.
- When creating a blank diskette image the default format is now .woz version 2. You can select .dsk or .woz version 1 manually.
- Solved an issue where the Mountain Clock card could be off by one hour during daylight saving time in a leap year.
- Improved compatibility of the 6502 and 65c02 BCD arithmetic emulation. Invalid (non-BCD) values are now handled in a
way consistent with the real hardware.
- Fixed an issue in handling IRQ (interrupt request). This solves a problem when running a2osx, and improves general compatibility.
- The OmniDisk drive, after the disk had been accessed, showed an incorrect picture while ejecting the disk. This has been fixed.
- Solved a number of issues related to macOS 11 "Big Sur".
- Updated the application icon to match the "Big Sur" style.
- Adjusted the behavior of empty slot ROM in the Apple //e, which improves compatibility with some low-level utilities.
- Fixed several typos in the Help file and user interface.
Version 10.0.1, July 2020
- Restored compatibility with macOS 10.13 ("High Sierra").
Version 10.0, July 2020
- Virtual machine snapshots can now be saved and restored at any time, without the need to close the virtual machine. This feature is available in the full-licensed version only.
- Improved woz disk reading. Some diskette images could not be opened, but now work fine.
- A virtual machine running at maximum speed could negatively affect the responsiveness of the user interface. This issue was most visible in macOS 10.15 (Catalina). This has been fixed by distributing the available CPU power in a better way.
- Reorganized the Scripts menu: it now makes a distinction between example scripts and user scripts. It also updates correctly if scripts are added or removed.
- Fixed an issue that could cause the RAM card to become unintentionally write-enabled.
- Diskette images modified by the Apple II software used to be saved every 30 seconds. Due to the introduction of the snapshot feature this is no longer the case. The diskette contents are part of each snapshot. Writing the contents to the diskette image file only occurs when a disk is ejected, when the virtual machine is closed, or when a snapshot containing the disk is openend.
- Removed the "Save Configuration" menu. A configuration can now only be saved with "Save Configuration As...".
- Did extensive cleanup of the source code. Replaced all deprecated macOS API, and converted to Swift 5. All this makes the application ready for future macOS developments.
- The application now requires macOS 10.14 ("Mojave") or better.
Version 9.3.1, May 2020
- Corrected an issue, introduced in version 9.3, that could cause double high resolution screens to be rendered incorrectly.
Version 9.3, April 2020
- Added support for the 13-sector Disk ][ card.
- In macOS 10.15 (Catalina) the window position is now correctly restored when starting the application.
- Game controller calibration is now saved between runs of the applications.
- Improved the accuracy of the analog game paddle input values.
- Solved a number of issues of the embedded application A2V2 - it now works again in macOS 10.15 (Catalina).
- Fixed a subtle error in handling the 80Store memory switch in the Apple //e.
- Fixed an issue that caused the arrow keys to produce wrong key codes if "Use Command Key as Open Apple" was active.
- Solved a few layout issues in the Video Inspector and Memory Banks Inspector.
- Solved a number of crashes.
Version 9.2, September 2019
- The application is now compatible with (the public beta of) macOS 10.15 Catalina.
- Fixed an issue in the Mockingboard card that could cause the sound quality to degrade after a few minutes of play.
- Corrected a memory-related issue in the SCSI card; this improves general compatibility.
- Note that when starting the app in Catalina, the main window appears with a default size and position.
This is a side effect of a work-around necessary to avoid a crash.
Version 9.1.4, July 2019
- Fixed an issue that caused characters getting lost when pasting text from the Mac environment into AppleWorks.
- Fixed a bug (introduced in the 64-bit version of teh app) where reading a cassette tape failed if the AIFF file contains an unrecognized chunk.
- Fixed a potential crash when reading an invalid woz disk image.
- Creating a blank woz version 1 disk resulted in an invalid disk image. This now works as it should
Version 9.1.3, April 2019
- Solved a crash in the print engine that occurred when saving a pdf file with printed graphics. This problem first appeared after upgrading macOS to version 10.14.4.
- Improved mapping for Swedish keyboards.
- Fixed an oversight in the 6502 emulation; the "B" flag is now handled correctly in a PHP instruction. This improves general compatibility.
- The RS-232 status lights in the serial port item work again.
- Configuring the serial port was not possible in macOS 10.11 (the application crashed). This has been fixed.
- Solved a number of smaller crashes.
Version 9.1.2, February 2019
- Fixed an issue, introduced in version 9.1, that could cause accessing a ProDOS diskette to fail; the diskette spun endlessly instead.
Version 9.1.1, February 2019
- In macOS 10.13 (High Sierra) the Apple II screen was shown all black or sometimes semi-transparent. This has been fixed.
- Fixed a crash that occurred if the scan lines button was visible in the tool bar.
Version 9.1, January 2019
- Disk drives can be configured with a "read only" switch. While the virtual machine runs, just flip the switch to "on" to prevent the disk from being modified.
- The "Make All Drives Read-Only" entry in the Quick settings menu is a shortcut to protect all mounted disks in one go, essentially making the whole virtual machine read-only.
- Added support for quarter-tracks on woz disk images. A game like Frogger (protected with the SpiraDisc copy protection) now runs.
- Improved the woz2 implementation by taking the "optimal bit timing" into account. Disks protected with Infocom's 18-sector format (such as Border Zone) now run as they should.
- For woz diskette images added a new Spotlight key with the woz version number. The information is shown in the Finder's Get Info window, or can be used with the mdfind command-line tool (for example: mdfind virtualii_md_wozversion == woz2).
- Significantly improved the screen update performance, in particular on large high-resolution (retina) screens.
- The built-in QuickLook module now takes care of drawing diskette icons in the Finder. As with the diskette's QuickLook preview, the icons show labels listing the files on the disk image.
- Added DOS 4.x compatiblilty to the Spotlight and Diskette QuickLook modules.
- The application now rejects an attempt to insert a 3.5 inch diskette image (it crashed in the previous version).
- The application silently ignored the (very rare) case where a modified diskette cannot be saved. This oversight has been fixed; the application now shows an error message.
- Improved stability by solving a number of potential crashes.
Version 9.0, January 2019
- Introduction of the "peripherals" side bar, combining the contents of the device and performance drawers.
Due to Apple deprecating the drawers feature in macOS 10.14, these drawers have been removed.
- Full support for the version 2 woz disk format.
- With the new peripherals side bar, devices and the performance monitor are now available in full-screen as well.
- Showing and hiding devices has been renamed to Show / Hide Peripherals, and can be found in the View menu.
- The device buttons now have retina resolution.
- The Inspector window, when opened from a full-screen main window, now shows up in the same screen space.
- In macOS 10.14, some of the demo Applescripts asked the user for permission to control the Finder, and sometimes
refused to run outright, without even asking for this permission. This has been fixed – the Finder is no longer
involved in these scripts.
- Repaired the "Customize Toolbar" function (it crashed in the previous version).
- Removed the feature to use the Mac mouse as a game controller. This was still based on the no longer supported
"kiosk" full-screen mode.
- Removed the option of resizing the main window to match an exact multiple of Apple II pixels (2x, 3x or 4x). This was
a left-over from the early days of the application, when free window resizing was not available for performance reasons.
Version 8.6, August 2018
- Added a keyboard shortcut to enter and exit full screen.
- The Inspector's instruction trail now also shows the processor cycle count at the start of each instruction.
- The instruction trail can now be saved as a tab-separated text file.
- Increased the maximum capacity of the instruction trail to 9999999 instructions (a tenfold increase). This is enough to capture roughly 35
to 40 seconds of CPU activity at regular speed. Be aware that saving such a large trail takes some time and results in a big file!
- When ejecting a diskette, the disk image was always saved, even if the disk had not been modified. This bug was introduced
recently, and has now been corrected; a disk image is only saved when the disk contents have acually been changed.
- ProDOS disk images with a ".po" filename extension and a size of 800 KB (or larger) can now be mounted as an OmniDisk,
and are also processed by the Spotlight importer.
- Disk images with a .nib extension now show up in the disk search window as "custom file system".
- Fixed an issue in the SCSI card emulation that could corrupt the "screenhole" memory locations in auxiliary memory, whereas
it should have used main memory. In the revised ROM code the screen hole memory isn't used anymore at all.
- If a USB or Bluetooth game controller is connected, the option to use the keyboard arrows as a joystick is now disabled. It appeared
that the latter option could corrupt the values received from the game controller (even without touching the arrow keys).
- Powering up a virtual machine with an OmniDisk resulted in a boot failure if a higher numbered slot contained a card with
expansion ROM. This now works as it should.
- Changed built-in web links from http to https (for servers that support https).
Version 8.5, July 2018
- Added Dark Mode support for macOS 10.14 (Mojave).
- Woz disk image files are now shown correctly (enabled) in the disk open panel.
- Reading a an empty diskette drive did not trigger an I/O error - the drive just spun endlessly. This now works correctly.
- Writing to a diskette while more than one diskette is mounted could result in a corrupt disk image. This has been fixed.
- On the iMac Pro, game paddle emulation with a USB / Bluetooth game pad did not work correctly. To solve this, and
to make the app future-proof again, this part of the app has been fully rewritten using modern API.
- Redesigned the game pad configuration window.
- Fixed an issue that could result in Virtual ][ becoming unresponsive when performing diskette I/O at top speed.
- The app crashed in macOS 10.11 and 10.12 when selecting "Import Disk Images in Spotlight". This has been fixed.
- Changed the way the command key is handled, improving compatibility with some text editors (such as UCSD Pascal 1.2).
- Fixed an issue that caused the ImageWriter configuration window to remain visible after clicking OK or Cancel.
- Solved several crashes.
Version 8.4, June 2018
- Improved "woz" disk image compatibility; the application now deals better with several copy-protection schemes.
- If a woz disk's internal write protect property is set, QuickLook now shows the disk without a write-protect notch, to
indicate that it cannot be made write-enabled (or at least not without special tools).
- Improved rendering of monochrome high resolution screens; it now shows a "half-pixel" shift where appropriate.
- The game controller configuration now only contains the type of controls that can actually be mapped to the Apple II game I/O:
push buttons as well as axis controls such as joysticks and sliders.
Version 8.3, May 2018
- Support for the "woz" disk image format. The woz format and implementation guide was created by John Morris
in conjunction with his Applesauce project. It allows for disk images that are like a carbon copy of the original
disk — even their copy protection checks can't tell the difference.
- The disk search window now allows selecting a "custom" fle system (i.e. none of the well-known file systems). This
makes it easy to find copy-protected woz disks, either by disk name or by included meta data.
- Added a pull-down menu, along with keyboard shortcuts, to eject disks from their drives.
- Fixed an issue that could cause the disk recalibration sound to continue playing for too long.
- Cassette tape files (.cass) now show the correct icon / preview in the Finder.
- Updated diskette and cassette tape icons to high resolution (retina) quality.
Version 8.2, April 2018
This version fixes a number of issues reported by users, and simplifies ROM file installation.
- Added a menu to open the folder where the ROM files must be installed.
- In the game controller configuration, selecting the action "None" crashed the application. This has been fixed.
- Fixed an issue that caused a disk image file with the "v2d" format to be corrupted when ejecting the disk.
- Enhanced Mockingboard compatibility by increasing its interrupt frequency.
Version 8.1, January 2018
This version adds two preference settings, but mainly fixes issues reported for version 8.0.1.
Thanks everyone for your feedback!
- Added a preference to use the H.264 codec for making a screen movie, even if the HEVC codec is available.
- Added a preference to suppress the large "Paused" indicator.
- Making a screen movie in macOS 10.11 and 10.12 now works as it should; the application no longer crashes.
- Fixed an issue that crashed the app when unplugging the game controller.
- Double-clicking a disk in the Finder worked only once per run; this has been fixed.
- When saving a configuration, the save dialog incorrectly gave the option to select a file type (such
as disk image). This has been fixed.
- The "Current PC" button in the Inspector could result in blank lines in the disassembly. This has been fixed.
- When rebooting a virtual machine, the main window now stays the active window if the Inspector is open.
- If a configured ROM image file cannot be read, the application now presents an error message
identifying the path of the missing file. In the previous version the application crashed.
- Fixed numerous (albeit minor) memory leaks.
- Updated the documentation of the A2V2 disk transfer utility.
Version 8.0.1, December 2017
This version contains extensive behind-the-scenes updates and rewrites to remain compatible with new versions of macOS, forming
a basis for further future development.
For example, the application was still 32-bit; as of this release it is a 64-bit
app, making it compatible with modern Mac APIs, improved memory management, etc.
Furthermore:
- A disk image file can now be double-clicked in the Finder to start a virtual machine with that disk inserted.
- Added the feature to speak the text on the Apple II screen, using the Mac voice synthesizer.
- Fixed an issue that could cause a new virtual machine window to appear with a very small size.
- Clarified the section in the Help file on game controller setup.
- Fixed an issue that caused the Inspector's disassembly to show empty lines when scrolled.
- Rewrote the "movie making" feature to use the AVFoundation framework. When running macOS 10.13 (High Sierra) or later, the movie is written using the HEVC codec. Older system use the H264 codec.
- Removed the option to select a folder where the ROM files are located. This feature often caused confusion, and led to some tricky problems. You can however still select a specific ROM file for a virtual machine. If you don't specify such a file, the app will search for a matching ROM file in one of the standard locations.
- The app now submits crashes or similar app issues to the developer. These reports are fully anonymous, and help improving the app. If you wish you can disable it in the application preferences.
Version 7.6.1, March 2017
- Checkboxes did not show up correctly in the Search Disk window; this has been fixed.
Version 7.6, March 2017
- This upgrade requires OS X 10.11 (El Capitan) or better.
- Rewrote the full-screen feature; it now works for individual windows, using the familiar green button in the window title.
- The main window can now be resized freely, and is not limited anymore to the small / medium / large sizes.
- Fixed an issue that caused the application to incidentally ignore ROM files in the application folder.
- Closing a virtual machine while the Inspector window is open no longer results in a crash.
- Improved the screen refresh performance; this fixes an issue where the Apple II screen sometimes briefly showed gray areas.
Version 7.5.5, January 2017
- Double-clicking a disk image in the Finder didn't result anymore in inserting the disk in a drive. This has been fixed.
Version 7.5.4, January 2017
- A new option allows forwarding all Command-key combinations to the virtual machine as "Open Apple"
key combinations, instead of being handled by the emulator.
- Fixed an issue that could cause the application to not recognize the appropriate ROM file.
- Removed the "full screen mode" feature.
Version 7.5.3, August 2016
- Licenses can be purchased at the FastSpring store.
- The minimum required system version is Mac OS X 10.7 ("Lion").
Version 7.5.2, January 2015
- Fixed an issue that could cause the virtual procesor to get stuck in an endless loop.
Version 7.5.1, January 2015
- The right arrow key did not work correctly when used for game control. This has been fixed.
Version 7.5, January 2015
- Support for two Mockingboard cards in one machine, in order to listen to max. 12 channels.
- Corrected an issue with double low resolution colors.
- Added an experimental feature: the super serial card emulation can now work with Unix named pipes (full license only).
- Improved timing of video rendering; the Apple //e cursor now blinks with constant time intervals.
- The RAMWorks card now has a maximum capacity of 16 MB (was 8 MB) (full license only).
- Relaxed the requirements for a custom character set definition: the file can now be either tiff or png, 1-bit or 8-bit.
- The Preferences window now shows the correct tab when opened.
- Simultaneous disk drive and printer sound effects could cause a crash - this has been fixed.
- The print preview now takes the scrollbar preferences into acount.
- Saving the machine state could potentially cause a crash - this has been solved.
- Fixed an issue where "high speed mode" sometimes incorrectly dropped back to regular speed.
- The Quicklook preview for saved state documents works again.
- The preview of saved state documents can now show horizontal scanlines.
- Fixed a Yosemite compatibility issue in the disk transfer application (A2V2).
Version 7.4.1, December 2013
- Fixed some issues with the new SCSI card emulation introduced in version 7.4.
Version 7.4, December 2013
- The emulated SCSI card previously supported only the ProDOS block interface; it now supports the
"SmartPort" interface as well, thereby improving Apple II compatibility.
- When a Mac folder, extracted from a Shrinkit archive with
Shrink-Fit X,
is mounted as a ProDOS disk, Virtual ][ automatically uses the file types and
other metadata provided by Shrink-Fit X.
- When a Mac folder, mounted as a Prodos disk, is ejected from Virtual ][, the Finder now shows the
updated file structure correctly.
- Some of the demo Applescripts didn't work correctly because of Mavericks' app nap; this has been fixed.
- Added an Applescript command that makes it easy to have a script pause until the virtual machine
displays a specific screen. The script "Mockingboard demo" demonstrates this technique.
- Fixed an issue that could cause the memory of an Apple //e to be incorrectly initialized.
Version 7.3, September 2013
- The "No Slot Clock" now reports Monday as weekday no. 1. Previously it reported
Sunday as day no. 1, which was incorrect.
- Added Applescript properties for better control of the connected devices.
- The application preferences now offer two color schemes for high resolution rendering.
- The Inspector now retains its window positions when the virtual machine is restarted.
- Fixed several layout and font issues in the Inspector.
- "Set Disk Properties" in the Media menu no longer refuses volume numbers 0 and 255.
Version 7.2.1, March 2013
- Fixed an incompatibility of the sound effects with Mac OS X 10.7
Version 7.2, March 2013
- Rewrote the Apple II sound emulation. As a result, the application no longer crashes
when a headphone is inserted or removed
- Fixed an issue that crashed the application when waking the Mac from sleep
- Fixed a layout issue in the RAMWorks configuration panel
Version 7.1, December 2012
- Fixed an issue that could cause Apple II screen pixels to be randomly shown or hidden.
- Improved implementation of the "mounted OS X folder" feature to fix an incompatibility with EDASM.
- Some of the Applescript demos didn't work in version 7.0; this has been fixed.
Version 7.0, July 2012
- Updated the program to be fully compatible with Mac OS X 10.8 (Mountain Lion).
- Improved accuracy of high resolution colors by adding emulation of NTSC TV color logic.
- Modernized the appearance of the main window.
- The Inspector can now save a memory dump of the virtual machine to a file.
- Added the Bulgarian character set.
Version 6.5, February 2012
- Fixed an issue where the Mockingboard card could halt the virtual machine (this happened, for example, in Ultima IV).
- Corrected an issue in the "floating bus" screen rendering, thereby improving compatibility.
- Fixed an issue that could cause stray pixels on the emulated screen when switching from 80-column text to low-resolution graphics.
- Improved screen rendering perfomance by using Apple's Grand Central Dispatch technology.
Version 6.4.1, January 2012
Corrected some minor issues that were introduced in version 6.4:
- Double-clicking a disk in the Finder didn't work anymore when Virtual ][ did not run - this has been fixed.
- All pictures in the Inspector Help were missing - this has been corrected.
Version 6.4, January 2012
- Dropped support for Mac OS X 10.5 and the PowerPC processor. The program now requires
an Intel Mac running Mac OS X 10.6 (Leopard) or better.
- Added a feature to change the write protection and volume number of disk images.
- It is now possible to configure a 65C02 processor in an Apple ][ or ][+ virtual machine.
- When choosing "Copy as Text" from the Edit menu, international characters on the screen are
now correctly copied to the Mac clipboard.
- Improved the quality of the QuickLook preview and thumbnail of a saved state file.
- Some custom character sets were not accepted by the virtual machine - this has been fixed.
- Fixed a number of minor issues, thereby improving the overall stability of the program.
Version 6.3.7, April 2010
- Fixed an issue that could cause the arrow keys to generate incorrect game paddle values if used in combination with the command key.
- Added a convenience menu in "Quick Settings" to easily invert the direction of the up and down arrows when used as a joystick.
- The Mac OS X Finder now correctly recognizes disk images as Virtual ][ files.
Version 6.3.6, February 2010
- The program now accepts "dsk" image files with 41 tracks (the maximum so far was 40).
- A recent Snow Leopard upgrade broke the "Make Movie from Apple II Screen" feature. This has been fixed.
- Cassette tape files now get file name extension "cass" instead of "aif". As a result, the cassette tape
icon appears correctly again in Snow Leopard. Old "aif" files can still be read.
Version 6.3.5, October 2009
- Improved emulation of Apple II interrupts; as a result, the program "Publish It" version 4 can now be used with the mouse.
- Corrected an error in the emulation of several 65C02 instructions (particularly TSB and TRB). This enhances compatibility with Apple //e applications.
- Relative mouse mode is now correctly restored from a saved state file. This was an omission in previous versions.
- Fixed a few spelling errors in the Inspector and tool tips.
- Fixed an issue that could cause the text color on the Apple II screen to become white after clicking "Cancel" in the the configuration panel.
Version 6.3.1, September 2009
- If the preferences were set to skip the "save" question, the application crashed when quitting. This has been fixed.
Version 6.3, August 2009
- The program is now fully Mac OS X 10.6 "Snow Leopard" compatible.
- Fixed an issue, introduced in version 6.2, where the video inspector didn't render the text screen correctly.
- Fixed an issue that caused the "open Apple" key emulation to work poorly in full screen mode (in Mac OS X 10.5 "Leopard" only).
- In full-screen mode, the I/O activity indicator sometimes remained visible after I/O activity had ended; this has been solved.
- Fixed an issue, introduced in version 6.2, that could cause Applescript execution to crash the program (in Mac OS X 10.4 "Tiger" only).
- Fixed an issue (in Mac OS X 10.4 "Tiger" only) that prevented the use of the built-in French character set.
- In the configuration window, the character set preview showed a few stray pixels. This has been solved.
- Fixed an issue that could cause a gzipped disk image to be incorrectly renamed when ejected.
Version 6.2, July 2009
- Added power management options to save energy and enhance battery life on a notebook Mac.
- Fixed an issue that caused the game disk "World Karate Championship" to fail while booting.
- The Help menu now contains an item to open an online version of the Help section in a web browser.
- In the Inspector, fixed an issue where two lines in the disassembly could be highlighted at the same time.
- Resuming an original Apple ][ from a saved state file could result in incorrect video settings. This has been solved.
- Clarified some topics in the Help section: printing with a limited license, and joystick emulation with the keyboard.
Version 6.1, November 2008
- The Inspector now lets you modify Apple II memory and CPU registers.
- Corrected several issues in the game paddle emulation, thereby improving stability and general compatibility.
- Fixed an issue with the 6502 decimal mode emulation, which caused some UCSD Pascal programs to crash.
- Fixed an issue with the Epson FX80 emulation; in some cases double-width characters were not rendered correctly.
- Clicking an I/O address breakpoint in the Inspector made it invisible; this has been solved.
Version 6.0, April 2008
- Added a feature that lets you record the action on the Apple II screen as a QuickTime movie.
- Added a new module: DiskIIViewer. It allows the Mac OS X "Leopard" Finder to present
Apple II disk images in QuickLook and Cover Flow.
- Improved the quality of high resolution rendering.
- The "Search Disk Images" window now shows the results while typing, just like Spotlight.
- The "Search Disk Images" window now shows all diskette names with the selected file system (it used to omit empty disks).
- Added an Applescript command to make a snapshot of the Apple II screen and save it as a file.
- Added an Applescript command to dump (part of) the Apple II memory into a file.
- A mounted Mac folder (DOS) can now hold up to 200 KB (was 140 KB).
- The numeric keypad "enter" key of the mid-2007 iMac keyboard is now correctly recognized.
- Fixed an issue in the Spotlight module that could cause hdv disk images to be ignored.
- Fixed an issue that caused the program to crash if multiple virtual machines used the same serial port.
- This version requires OS X 10.4 "Tiger" or OS X 10.5 "Leopard". It
does not run on OS X 10.3 "Panther" anymore.
Version 5.8.5, November 2007
- Solved an issue (introduced in version 5.8) that caused flickering screen objects in some games (such
as Swashbuckler, Bolo and Choplifter).
- Improved the floating bus feature; the intro of the game "Money Munchers" now works as it should.
- The "Search Apple II Disk Images" feature now not only searches for matching Apple II file names, but
also for matching disk image file names.
- The Inspector can now show the Apple II screen as it would appear in any graphics mode.
- Substantially improved nibble copy and half-track copy in A2V2, resulting in much more reliable disk images.
- Added a menu to check for newer versions.
- Refined the keyboard mappings to more resemble the Apple II: shift-tab now acts as tab; numeric pad
"clear" acts as escape.
- Increased default screen refresh rate from 20 Hz to 30 Hz.
- Fixed an issue that could result in stray pixels all over the screen when switching
from text mode to graphics mode.
- Fixed an issue that caused the Saturn memory card to behave like a 16K instead of a 128K memory card.
Version 5.8, July 2007
- The A2V2 utility now supports transfer of Apple II disks containing half-tracks.
- Finished the implementation of the "floating bus", and added an example Applescript to
demonstrate this feature.
- Optimized graphic rendering, resulting in lower overall CPU load.
- Improved the compatibility of the Epson FX-80 emulation; it now works with the Fontrix application.
- The Inspector now shows the total CPU cycle count of the emulated 6502.
- Added an Applescript command to slow down text input from a script, and used it to make
the included demo scripts easier to follow.
- Solved an issue where the text "Paused" could remain on the screen after a restart of the machine.
- Solved an issue that could cause one disk image to be mounted in multiple drives at the same time.
Version 5.7.1, March 2007
- Added an feature to convert legacy DiskCopy disk images to a format supported by Virtual ][.
- When a newly created diskette image was ejected, the program crashed. This has been fixed.
Version 5.7, February 2007
- Added a "search all disk images" feature to the program that presents all disk
images found on the system, and allows fast searching for an Apple II file.
- The emulated diskette drives now allow inserting a diskette image in gzipped form.
- The Spotlight search module now also scans gzipped diskettes.
- Solved an issue that caused the emulated game paddle button #1 to "stick" when controlled
with the right mouse button or the alt key.
- The previous version (5.6) had introduced a problem with USB game pads on Intel Macs. This
issue has been solved.
- Solved an issue that prevented the use of reset (ctrl-F12) in full-screen mode.
- Solved a ProDOS compatibility issue concerning the Thunderclock card.
- Solved an issue that could cause the Inspector to show a wrong memory bank in the slot 3
memory space on an Apple //e.
Version 5.6, November 2006
- Added full implementation of the Super Serial card, allowing an Apple II program to connect to
an actual serial device, such as a dial-up modem.
- When the application is started for the first time, it now adapts the window size to best match
the computer's main screen.
- Solved an issue that caused ProDOS to fail when formatting a diskette.
- Solved an issue that could cause the program to crash when restarting a virtual machine.
- In very rare circumstances a modified diskette image was not saved when it was ejected. This has been fixed.
- Solved a minor issue with the print preview button; double-clicking while the print preview was open
made the presented output invisible.
- In the previous release, one of the ImageWriter pictures was missing, resulting in a blinking icon
in the devices bar while printing. This has been corrected.
Version 5.5, October 2006
- The arrow keys on the keyboard can now be used as a joystick.
- The "enter" key on the numeric pad can now be used as an alternative "return" key.
This is consistent with the numeric key pad of the Apple //e.
- Improved ProDOS compatibility of the Thunderclock emulation.
- Fixed a potential crash when the virtual machine is restarted.
- Fixed yet another issue with license key validation when Japanese is the system default language.
- Reorganized the long list of subjects in the documentation, in order to make it more accessible.
Version 5.4, August 2006
- Added emulation of the Thunderclock card, and made it the default clock card for all virtual machine types.
- The old "ProDOS clock card" is now obsolete. It is still supported, but can no longer be selected in a new configuration.
- Added emulation of the the Saturn 128K memory card.
- Improved the support for international keyboards.
- Added additional Apple II character sets: British, French, German, Itialian and Swedish.
- Adjusted the Apple //e character set, to eliminate some minor differences with the characters in the original machine.
- Added an AppleScript property to get the path of the configured favorite disk folder.
- The RAMWorks card can now be configured in increments of 64KB (was 128KB).
- The 16K RAM card can now be inserted in all slots, not only slot 0.
- Fixed an issue that prevented 2img disk images from being recognized on an Intel Mac.
- The "generic printer card", which has been obsolete since version 3.4, is no longer supported. It has been replaced
by the Grappler+ card and the serial printer card.
Version 5.3, June 2006
- The program can now be controlled with AppleScript.
- Added an AppleScript menu with a number of example scripts; they demonstrate many of Virtual ]['s features.
- Added a menu function to save a snapshot of the emulated screen as a tiff file.
Version 5.2, May 2006
- Improved the bundled A2V2 disk-exchange program: it is now also able to transfer
"copy-protected" disk images from an Apple II to the Macintosh.
- The Z80 card was not detected on an Intel Mac, and hence didn't work. This
has been fixed.
- Fixed an issue with license key validation when Japanese is the system
default language.
- Fixed an issue with keyboard emulation: open apple + esc is now correctly
forwarded to the Apple //e.
- Fixed an issue that could cause a ProDOS shared folder to report an I/O error
when updating file metadata (like the binary load address).
- On the Apple ][ and ][+, the "Show 80 Column Video" menu sometimes failed
to update the screen. This has been fixed.
Version 5.1, March 2006
- The program now comes as a universal binary, fully compatible with both the Intel and the Power PC Macintoshes.
- Added emulation of the ImageWriter II printer.
- Fixed an issue in the mouse card; as a result the emulation now supports the Apple II program "Blazing Paddles".
- Improved disk drive timing: as a result the Apple II program "Wasteland" now runs from copy-protected (.nib) disk images.
- Changed the Mockingboard card in such a way that the Apple II program "SkyFox" now detects and uses the card.
- Added a configurable option to skip the "save state" dialog when closing a virtual machine.
- Fixed an issue that resulted in wrong game paddle values when the machine ran at high speed.
- Fixed a potential crash in the Inspector when analyzing some types of copy protected disks.
- The "soft caps lock" feature doesn't affect pasted text anymore; it only affects typed characters, as it should.
- Solved an issue in sound handling that could lead to a deadlock when resetting the virtual machine.
- The "relative mouse mode" setting is now stored when saving a configuration file.
Version 5.0, January 2006
- Added a major new feature: the "Inspector". It allows to closely watch the behavior of the virtual machine and debug
Apple II programs.
- Made the "speed dial" options more accessible by assigning keyboard shortcuts to them.
- Improved compatibility of the simple text printer.
- Solved a bug that caused wrong license key evaluation when Japanese was the system default language.
Version 4.3, November 2005
This is a bug-fix release.
- Solved an issue in the built-in Spotlight module, which could cause endless rescanning of hard disk image files.
- The Spotlight module now does a better job in recognizing the file system on diskette image files. It sometimes
skipped valid DOS images.
- Improved the compatibility of the A2V2 program, to support more types of USB-to-serial adapters.
Version 4.2, October 2005
- Added the option to convert diskettes from and to a real Apple II via a serial cable.
- Added emulation of the "no-slot clock".
- It is now possible to print text to the Macintosh clipboard.
- A configured machine can now be made the default machine in one simple step.
- The Preferences window has an option to open the devices drawer to either the bottom
or the right side of the window. Opening it on the right side is particularly useful on
small screens.
- When an USB game pad is connected, it is now automatically the preferred choice for game control.
It used to be a configurable option, but this could easily lead to a seemingly not-working game pad.
- Improved artwork of the Printer button: it finally looks like a printer.
- Solved problems with the game "Alternate Reality The Dungeon" by improving
the emulation of the stepper motor in the diskette drive.
Version 4.1, August 2005
- A Mac OS X folder can now be mounted as a ProDOS disk image, making it easy to share files and folders between
the Apple II and Mac environments.
- The included Spotlight module now also scans ProDOS disks (OS X 10.4 "Tiger" only).
- The program now suports double low resolution graphics on the Apple //e.
- Solved a diskette compatibiliy problem; as a result the game "Alternate Reality The Dungeon" now runs.
- Solved a cassette port compatibility problem; as a result "Beyond Castle Wolfenstein" now runs.
- Solved a issue that could cause the machine to run too fast in "high speed" mode (it would behave like "maximum speed" instead).
Version 4.0, June 2005
- Added a much requested feature: the Mockingboard emulation. This is a free upgrade for all licensed users.
- Changed the configuration of the default machine to include the Mockingboard in slot 4.
- Solved a bug that could cause failure to read a saved state file.
Version 3.5.1, June 2005
- Fixed a bug that caused the Epson emulation to render text in a much too small font. This occurred in OS X 10.4 only.
- Made some subtle timing adjustments in disk I/O; as a result the "Apple Cider Spider" game now runs.
Version 3.5, May 2005
- The program is now fully OS X 10.4 "Tiger" compatible. The program still runs on Panther,
provided the version is 10.3.9. The program does not run on OS X 10.2 "Jaguar" anymore.
- Included a Tiger Spotlight module that allows fast searching for Apple ][ files.
- A diskette image can now be inserted in the virtual machine by double-clicking it in the Finder, or selecting it in Spotlight.
- Improved compatibility of the emulated mouse. As a result, it is now possible to run the "GEOS" program.
- Included a link to the new Virtual ][ Forum in the Help menu.
- The 6502 an Z80 engines now benefit from the additional speed of the G5 processor, if available. The program is still fully compatible with the G3 and G4 processors.
- Fixed a bug that caused some solid apple key combinations (like solid apple-N) to be ignored.
- Fixed some bugs with Macintosh folders mounted as DOS diskettes.
- Fixed some minor problems in the 65C02 implementation, increasing general compatibility.
- Solved a bug in the mouse card firmware; it can now handle interrupt mode and should therefore now work in any Apple ][ program.
- Fixed a bug in Apple IIe memory-bank switching, improving general compatibility
Version 3.4.1, March 2005
- Corrected an issue introduced in the 3.4 version, that could cause CP/M to fail
during boot.
Version 3.4, January 2005
- Added emulation of the Grappler+ printer interface card. The previously used
"generic" printer card is now obsolete and can no longer be selected.
- The emulated Epson FX-80 now supports user-defined characters.
- Improved quality of high resolution graphics rendering. In particular text rendered
as graphics is now more readable.
- Reviewed and improved handling of the internal ROM on the Apple //e; as a
result the overall compatibility has been improved.
- Improved the maximum speed of the emulated processors (both 6502 and Z80A) by about 10%.
- Improved behavior of the analog game inputs when resuming a virtual machine. Effectively, this means
a game can be resumed in a more controlled way.
- Changed the "underscore" character on the Apple //e to more closely match the original.
- Solved a bug that could cause a clobbered display when scrolling the print preview.
- Solved a bug in handling graphics printing in the Epson FX-80 emulation.
- Solved a bug in the disk drive that could cause ProDOS to get stuck in an endless loop.
Version 3.3, November 2004
- The program now produces the sounds of the disk drives and the matrix printer.
- Solved a bug that could assign the wrong file type to a new diskette image file.
- Solved a bug in the Epson FX-80 configuration window that was likely to crash the program.
Version 3.2, October 2004
- Further improved the sound quality of the emulated internal speaker.
- Added the "variable speed" option, to speed up lengthy operations.
- Solved a bug that could cause a valid license code to be rejected.
Version 3.1, September 2004
- Improved the rendering of double high resolution graphics;
the emulation now emulates an NTSC monitor. Effectively this
improves the graphics quality and the readability of text in
programs like Dazzle Draw or Apple Desktop.
- Improved accuracy of low-resoution colors and double high
resolution colors.
- Improved the efficiency of high resolution rendering by about
25%. As a result, the "Solid Hi-Res" option is now obsolete and
has been removed from the program (this was an option to gain
efficiency at the expense of accuracy).
- Significantly improved sound quality of the emulated internal speaker.
- Added a toolbar for easier access of common functions.
- The "Screen" menu is now named "View" and has been extended
with toolbar-related commands.
- The sound volume can now be changed.
- Added a menu command / toolbar button to open a Finder window
with the folder where your disk images are; in combination with
Mac OS X "Exposé" this is a comfortable way to quickly
select a disk image and drag it to a drive.
- An alias file of a disk image is now accepted when dropped on
a drive (the alias file must have the proper extension
though).
- The program can now automatically adjust the Mac monitor
resolution when going to full-screen mode. This solves perfomance
issues on big screens.
- The Apple //e, not the ][+, is now the default machine
when the program is first started.
- A "saved state" file gets a custom icon that is a miniature representation
of the emulated screen.
- Solved a bug: when the mouse was switched on and off (by the
Apple II software) in rapid succession, this could block the
Virtual ][ user interface. This occurred in Dazzle Draw
for example.
- Solved a bug that prevented full-screen mode to work correctly
in a multi-monitor setup.
- Solved a bug that was likely to crash the program when
starting with a "default.vii" configuration file.
Version 3.0, August 2004
- Added emulation of the Epson FX-80 printer (available in OS X
10.3 "Panther" or better).
- The state of a virtual machine can be saved so it can continue
to run later on.
- Included support for the RamWorks card on the Apple //e.
This card gives you up to 8 MB of memory, and replaces the "64K /
80 column card", which is now obsolete and no longer
supported.
- The program now includes a number of different character sets
ROM's and you can add your own character sets as well.
- Simplified the installation procedure for ROM image files.
Previously ROM files had to have specific names; now the program
automatically searches for a ROM file suitable for the machine to
be emulated.
- The "phosphor" color of the monochrome screen can now be
changed to any color; it used to be "green only".
- The video refresh rate of the emulated monitor can now be
configured.
- When doing a cold restart of the emulated machine
(ctrl-command-reset), the disks now stay in the disk drives.
- Improved compatibility of the mouse emulation; software like
Apple //e Desktop now runs fine.
- Fixed a bug that made it impossible to remove a diskette image
from a configuration.
Version 2.6, March 2004
Many of the enhancements are the direct result of feedback I
received from users. Thanks every-one!
- A floppy disk image can now be part of the configuration,
making it possible to create a turnkey system with a bootable
floppy disk image.
- A Macintosh folder can now be mounted as a DOS 3.3 floppy
disk.
- Added a quick way to select between 3 different standard
machines: Applel ][, Applel ][+ and
Apple //e.
- Added the option to define a default configuration, which is
used when the program starts.
- Introduced the option to use the Macintosh backspace key as
left arrow key.
- Improved support for the Open Apple and Solid Apple key on
the Apple //e.
- Added an optional disk I/O indicator light in full screen
mode.
- Added the "Media" pull down menu, which contains all commands
to insert disks and tapes.
- When a virtual machine window is closed the program now asks
for a confirmation.
- The standard window size can now be set as an application-wide
preference.
- Improved the efficiency of video rendering by about 30%.
- Solved a bug that prevented the game "Serpentine" to run.
- Solved a bug that corrupted the internal timing of a virtual
machine after the Macintosh woke up from sleep mode (solved this
in Panther, not in Jaguar).
Version 2.5.1, December 2003
- Fixed a Jaguar compatibility issue introduced in version
2.5
Version 2.5, December 2003
- Added support for ProDOS hard disk emulation.
- Added support for a USB joystick or game pad.
- Added emulation of a ProDOS compatible clock card.
- Improved the overall efficiency of the emulation engine by
about 25%. Effectively, this means the virtual machine consumes
less Macintosh processor time.
- Fixed a problem with keyboards that require the use of the
"alt" key for some special characters like "@" and "#". These
characters can now be entered in the normal way.
Version 2.1, September 2003
- Added emulation of the Z80 card, so it
is now possible to run CP/M.
- The speed of the 6502 processor can now
be configured from 1 to 10 MHz.
- The Apple ][ screen can now
be copied to the clipboard, either as graphics or as
text.
- Added the possibility to pause / resume
a virtual machine.
- Added support for the ".po" disk image
format.
- Changes in disk images were only stored
when the disk image was ejected. To prevent loss of data, a
modified image is now also auto-saved at regular intervals (every
30 seconds).
- Added a number of "Great
Apple ][ Links" under the Help menu.
- Changed the Reset key to function key
F12 (was F13), because not all Macintosh keyboards have the F13
key.
- Pasting text in the Apple //e 80-column
screen could lead to lost characters; fixed this
problem.
- Solved an issue that prevented some
versions of ProDOS to boot.
- Improved general compatibility of the
emulated mouse card.
- Both the mouse and the game controls are
operated by the Macintosh mouse. It appeared this caused problems
in some Apple ][ programs. Solved this by disabling
the game I/O while the Apple ][ mouse is switched
on.
Version 2.0, August 2003
This release adds much-requested features
and a number of other improvements.
- Emulation of the Apple //e,
including emulation of the 65C02 processor;
- Emulation of the Apple //e
80-column / 64K RAM card;
- Mouse card emulation;
- Full-screen support and multiple window
sizes;
- Full, configurable support for the Game
I/O connector;
- Added a configuration option to allow
choosing betweeen predefined machine types (Apple ][,
Apple ][+ or Apple //e). As a result, made some
changes to the way ROM files are found. Existing users might have
to change their configuration, as described in the
documentation.
- Solved an issue that caused the program
to crash when a disk was inserted while no disk drives were
configured;
- Improved slot configuration: a card will
now only fit in a slot where it will actually work.
Version 1.1, June 2003
This release contains numerous new features
and improvements.
- Now supports diskettes with up to 40
tracks (was 35).
- Added 80-column card and video
soft-switch.
- Added configurable cassette tape
playback volume, in order to allow reading a recording of an
actual Apple ][ tape.
- File extensions .DSK and .NIB are now
recognized as equivalent to .dsk amd .nib.
- Disk image type ".do" (or ".DO") is
recognized as equivalent to .dsk. When the disk image is modified,
the extension is changed to the more common ".dsk".
- The "View" menu has additional options
and has been renamed "Quick settings".
- Push button 1 of the game controller can
now be operated with the right mouse button or the alt
key.
- Added keyboard shortcuts for frequently
used menus, like show / hide devices and insert a
disk.
- Improved behavior of empty slots, so
software like ProDOS now recognizes them as "empty".
- Improved overall speed of the 6502
engine by about 30%. This does not mean the
Apple ][ software runs faster; it means the emulator
consumes less Macintosh processor time.
- Improved linefeed handling by the
emulated printer; as a result it does not produce superfluous
empty lines anymore.
- Added "floating bus" support in the I/O
addresses of the video generator. This undocumented feature is
used in some games. As a result compatibility has been
improved.
- Solved a bug with respect to the "shift
key modification". In release 1.0, I had assumed that pressing the
shift key "pressed" the game controller button. It appeared the
80-column card expects pressing shift releases the game
controller button.
- Solved a bug in handling of expansion
ROM (on a card). This improves general compatibility.
Version 1.0, April 2003
Initial release
Specifications of the virtual machine
- CPU
- MCS6502 / SY6502, running at 1.023 MHz to 10.230 MHz
(configurable). Only the "official" instruction set is supported;
all other opcodes are treated as NOP.
- WDC 65C02, running at 1.023 MHz to 10.230 MHz
(configurable).
-
- Main board
- Apple II revision 1.
- Apple //e revision B.
-
- Video generator
- Supports text, low resolution graphics and high resolution
graphics. Screen refresh rate is configurable at 10, 15, 20, 30,
or 60 Hz.
- On Apple //e also supports 80-column display and double
hires.
-
- Character generator ROM
- Can be configured to display only upper case characters or
upper and lower case characters.
- On the Apple //e, contains the regular and alternate
character sets.
- Allows installation of a custom character set.
-
- Monitor
- Configurable color or monochrome. Size can be set to 560
x 384 pixels (i.e. 1 Apple ][ pixel is presented as 2
x 2 Macintosh pixels), 840 x 576 (1 pixel is 3 x 3), 1120 x 768 (
1 pixel is 4 x 4), or full-screen.
- Monochrome "phosphor" color can be configured.
-
- ROM memory
- 12 KB configurable from an external file. Memory range $D000
to $FFFF. If the external file contains less than 12K of data, the
top part of memory is set up using the file, and the remaining
bytes are initialized to 0.
- The Apple //e has 16K of ROM, and uses the last 16K of
the ROM file.
-
- RAM memory
- Apple ][(+): configurable in sizes 4K, 8K, 12K, 16K, 20K, 24K, 32K, 36K and
48K.
- Apple //e: 64 KB built-in; can be upgraded up to 16 MB with the
RamWorks card.
-
- Sound
- The "speaker toggle" mechanism of the Apple ][ is
fully implemented using macOS Core Audio.
-
- Cassette interface
- Using the built-in cassette recorder module, sound produced by
the Apple ][ on the cassette output connector can be
recorded to an AIFF file, and (uncompressed) AIFF files can be
read and fed to the cassette input connector.
-
- Game connector
- All inputs of the game connector can be triggered with mouse
and keyboard, or with a USB game device. The output functions
(annunciators and C040 strobe) are not available.
-
- Keyboard
- All Apple ][ keys are supported, except "REPT".
Can be configured to enter upper case characters only, or upper
and lower case characters; on an Apple ][(+) the
shift key can be connected to operate button 2 of the game
connector (the "shift key modification").
-
- 16 K RAM Card
- Implements the Ramex 16 card. Fully compatible with the UCSD Pascal system.
-
- Saturn memory card
- Implements the Saturn Systems 128K memory card.
-
- Apple ][ 80-column card
- Emulates the Term 80 Video Display Interface.
-
- RamWorks III card (for Apple //e only)
- Configurable 64 KB to 8128 KB of RAM, with increments of 64 KB. Allows 80-column and double-hires display.
-
- Parallel printer interface card
- Emulates the Orange Micro Grappler+ card. The DIP switches are pre-configured to
support the Epson FX-80 printer.
-
- Serial printer interface card
- Emulates the Apple Super Serial Card, with the DIP switches pre-configured to
support the ImageWriter II printer.
-
- Super Serial card
- Emulates the Apple Super Serial Card (SSC). The emulation can work with real serial devices connected to
the Mac, or can communicate with other applications via a TCP socket or Unix named pipes.
Note that the SCC was also able to emulate the older "Serial Interface card", but Virtual ][ does not support
this option.
-
- Mouse card
- Emulates the AppleMouse // card.
-
- Epson FX-80 printer
- Emulates all Epson FX-80 features except printing proportional characters.
The output can be saved to a pdf file for further processing.
-
- ImageWriter II printer
- Emulates all ImageWriter II features except printing proportional characters and
selecting print quality. The output can be saved to a pdf file for further processing.
-
- "Text only" printer
- Writes to an ASCII text file in append mode.
-
- AppleClock card
- Emulates the Mountain Computer AppleClock. Is not compatible with the Apple //e.
-
- Thunderclock card
- Emulates the Thunderware Thunderclock Plus.
-
- No-slot clock
- Emulates the Dallas Phantom DS1216 SmartWatch/ROM Real-Time Clock.
-
- SCSI card
- Can only be used with the ProDOS software interface for block
devices. Does not actually support the SCSI standard and has no
documented I/O addresses. Is designed to work with the OmniDisk
emulated drive.
-
- ProDOS disk drive ("OmniDisk")
- Emulates an imaginary disk drive able to work with ProDOS disk
images of any size up to 32MB. The disk image formats supported
are "hdv" and "2img".
-
- Disk ][ card
- Emulates the Apple Disk ][ card for DOS 3.3 (16
sectors per track).
-
- Disk ][ drive
- Supports up to 80 tracks (including half-tracks). Diskettes
are implemented as disk image files or mounted Macintosh folders.
Supports sector formats as well as nibble formats. Supports
reading, writing and write protection.
-
- Mockingboard card
- Emulates the type "A" (a.k.a. "Sound II") Mockingboard card, which
means it contains two sound chips able to produce 6 simultaneous sound channels.
It does not support the speech chip.
-
- Z80 card
- Emulates the Zilog Z80A processor at a clock speed of either 2
MHz or 4 MHz (configurable).
-
- Timing
- Timing of all instructions is as specified in the Synertec
6502 Programming Manual. The internal clock runs with an
average speed of 1.023 MHz. This means that not every
individual instruction is accurately timed; however the average
timing is accurate when measured over longer time intervals.
Unsupported features
Not all Apple ][ hardware
features are supported, and some things work slightly
different.
- The Mountain Computer AppleClock emulation does not
support setting the current time. It adjusts itself automatically
according to the Macintosh system clock.
- The emulated Z80 processor does not implement the
IN and OUT instructions, and does not implement interrupt
handling. These are not severe limitations, because I/O is
memory-mapped on the Apple ][, and because all
interrupts generated by the virtual machine are supposed to be
handled by the 6502 processor.
- The emulated matrix printers do not support proportional characters.
- The Super Serial card does not support emulation of the P8 and P8A versions
of the Apple II Serial Interface card (SIC).
- The C040 strobe on the Game I/O connector is not supported, and will never be.
According to Apple's documentation, this 5 volts line can be dropped to zero volts by an
application, for the duration of one-half microsecond. Such a short event cannot be
accurately emulated.
Why did I create this application?
I bought my first computer, an
Apple ][ "europlus", in early 1982. It had 48 KB of RAM, a
monochrome green monitor, and one Disk ][ drive. It was
really expensive, but I never regretted the purchase. On the
contrary: during the years I used the machine, from 1982 to 1986, it
gave me enormous amounts of fun, and in the end it was worth every
penny I paid for it. During that period, I purchased numerous add-on
peripheral cards, such as the 16K RAM card, a Z80 card, an 80-column
card, clock card, and a PAL TV card. The latter allowed me to finally
see, on my TV screen, the colors the Apple ][ produced.
I thoroughly enjoyed
writing programs for the Apple ][, while
discovering how everything worked inside the computer.
In 1986 I bought my first Mac, and soon after the
Apple ][ was moved to the basement. Ten years later,
around 1996, I discovered that a number of very good Apple ][
emulators were available for the Mac, such as Stop The Madness (STM) and Catakig.
One weekend, I got the Apple ][ from the basement, set
it up on my desk, and to my surprise everything still worked without
a problem. I connected the Apple ][ to the Mac
with a serial cable, and wrote software on both machines to convert
my collection of floppy disks to disk images on the Mac. Again to my
surprise, all disks could be read without a problem despite their ten
years in the basement. In the end, I managed to convert all my
disks, even the "copy protected" ones, like Bag of Tricks and
Visicalc.
The purpose of this was just to enjoy the
nostalgia and relive the magical early days of the home computer era.
When I switched to Mac OS X in early 2002, I was a bit disappointed that none
of my favorite Apple ][ emulators were available in
the new OS, and took the first steps to write one myself.
It seemed like a challenging and fun project, and it has been ever since.
While developing Virtual ][, the more than 20
years old Apple ][ again played an important role. I used it for
almost all of the pictures in the application, and it was instrumental
for comparing the behavior of the emulator with "the real thing".
